Developing a source code editor in JavaFX (without e4 and OSGi)

In my last blog post I introduced the DSL we’ll ship with e(fx)clipse 2.1 in August 2015.

Our main deployment platform is of course e4 on JavaFX but because we have a clean architecture based on IoC and services our components don’t know about OSGi and hence can be used in any Java(FX) application no matter if you run on OSGi or not.

To show you that those are not idle words the first blog showing the code editor components in action uses plain Java and maven as build tool – for those who want to use them in OSGi a blog will follow soon.

app

The following video demonstrates the final application in action

Step 1: Install e(fx)clipse 2.1 or later

At the time of this writing e(fx)clipse 2.1 has not been released so the best option to get started is to download our all-in-one nightly build.

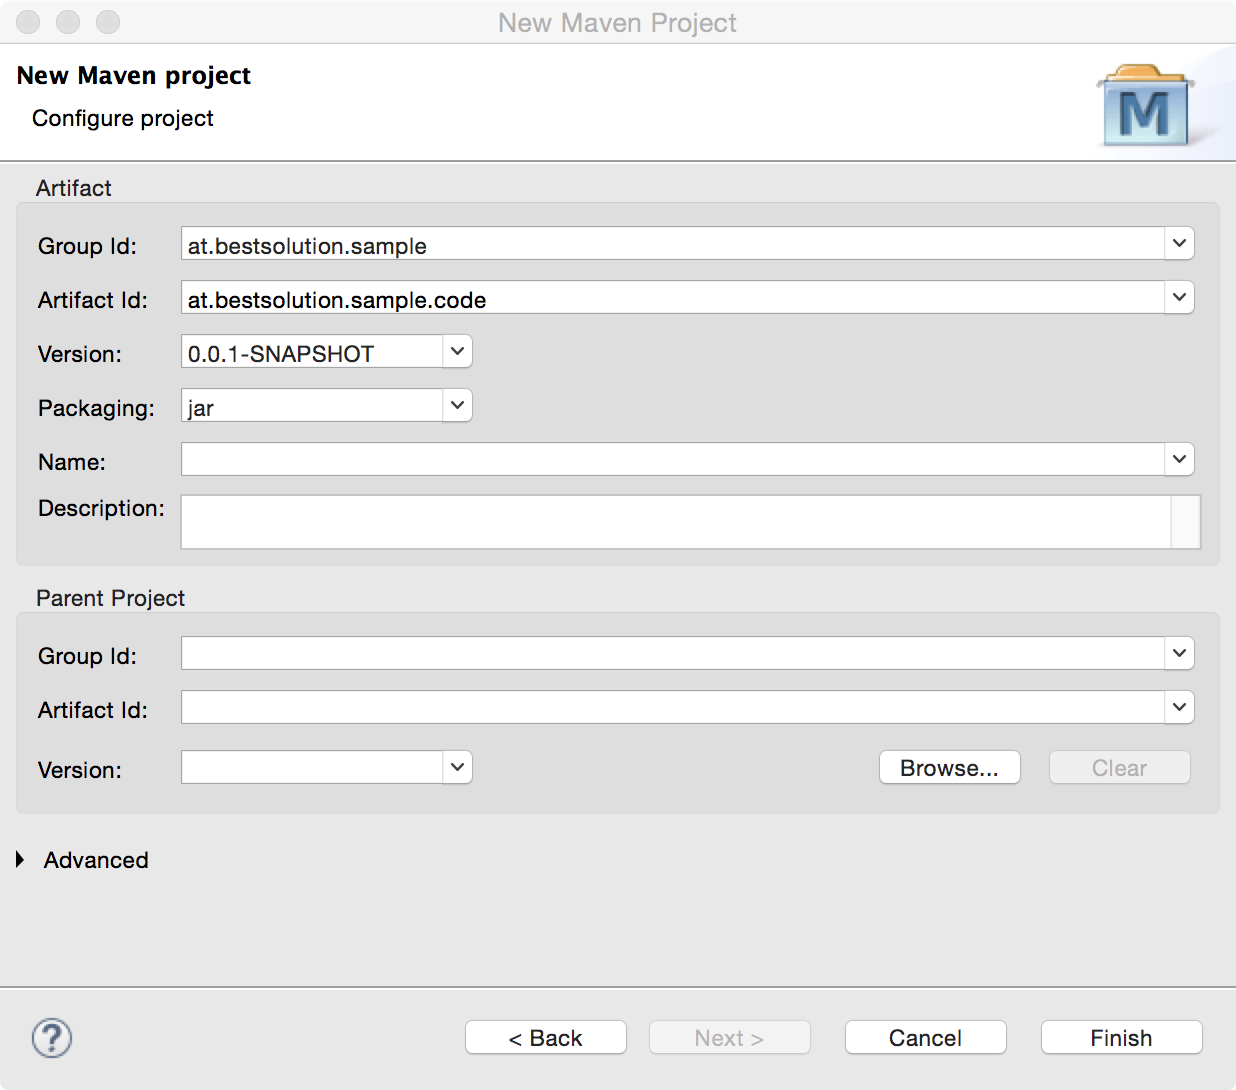
Step 2: Create a new maven project

maven

maven2

maven3

maven4

Step 3: Modify the pom.xml

First we need modify the source and target version for the Java compiler by adding:

<!-- ... -->
<build>
	<plugins>
		<plugin>
			<artifactId>maven-compiler-plugin</artifactId>
			<configuration>
				<source>1.8</source>
				<target>1.8</target>
			</configuration>
		</plugin>
	</plugins>
</build>
<!-- ... -->

Because the dependencies have not yet been released we need to add the Sonatype snapshot repository with:

<!-- ... -->
<repositories>
	<repository>
		<id>sonatype-snapshots</id>
		<url>https://oss.sonatype.org/content/repositories/snapshots/</url>
	</repository>
</repositories>
<!-- ... -->

And finally we add the JavaFX-Code editor component with:

<!-- ... -->
<dependencies>
	<dependency>
		<groupId>at.bestsolution.eclipse</groupId>
		<artifactId>org.eclipse.fx.code.editor.fx</artifactId>
		<version>2.1.0-SNAPSHOT</version>
	</dependency>
</dependencies>
<!-- ... -->

At the end your pom.xml should look like this:

<project xmlns="http://maven.apache.org/POM/4.0.0" xmlns:xsi="http://www.w3.org/2001/XMLSchema-instance"
	xsi:schemaLocation="http://maven.apache.org/POM/4.0.0 http://maven.apache.org/xsd/maven-4.0.0.xsd">
	<modelVersion>4.0.0</modelVersion>
	<groupId>at.bestsolution.sample</groupId>
	<artifactId>at.bestsolution.sample.code</artifactId>
	<version>0.0.1-SNAPSHOT</version>
	<repositories>
		<repository>
			<id>sonatype-snapshots</id>
			<url>https://oss.sonatype.org/content/repositories/snapshots/</url>
		</repository>
	</repositories>

	<dependencies>
		<dependency>
			<groupId>at.bestsolution.eclipse</groupId>
			<artifactId>org.eclipse.fx.code.editor.fx</artifactId>
			<version>2.1.0-SNAPSHOT</version>
		</dependency>
	</dependencies>

	<build>
		<plugins>
			<plugin>
				<artifactId>maven-compiler-plugin</artifactId>
				<configuration>
					<source>1.8</source>
					<target>1.8</target>
				</configuration>
			</plugin>
		</plugins>
	</build>
</project>

Step 4: Language definition

Now that we have configured our project appropriately we can start defining our application. We start with creating a package like “at.bestsolution.sample.code” and there we add a file named “dart.ldef

ldef

After the file is created. Eclipse will prompt you for adding the Xtext nature to your project because of course the DSL is implemented with the help of Xtext.

ldef_2

The last step before we start defining our language is to make some modifications to the project. So open the project properties and navigate to LDef/Compiler check the “Enable project specific settings” and modify the Output Folder/Directory value to src/main/java

ldef_3

Now paste the following content to the dart.ldef file:

package at.bestsolution.sample.code

dart {
	partitioning {
		partition __dftl_partition_content_type
		partition __dart_singlelinedoc_comment
		partition __dart_multilinedoc_comment
		partition __dart_singleline_comment
		partition __dart_multiline_comment
		partition __dart_string
		rule {
			single_line __dart_string "'" => "'"
			single_line __dart_string '"' => '"'
			single_line __dart_singlelinedoc_comment '///' => ''
      		single_line __dart_singleline_comment '//' => ''
      		multi_line __dart_multilinedoc_comment '/**' => '*/'
      		multi_line  __dart_multiline_comment '/*' => '*/'
		}
	}
	lexical_highlighting {
		rule __dftl_partition_content_type whitespace javawhitespace {
			default dart_default
			dart_operator {
				character [ ';', '.', '=', '/', '\\', '+', '-', '*', '<', '>', ':', '?', '!', ',', '|', '&', '^', '%', '~' ]
			}
			dart_bracket {
				character [ '(', ')', '{', '}', '[', ']' ]
			}
			dart_keyword {
				keywords [ 	  "break", "case", "catch", "class", "const", "continue", "default"
							, "do", "else", "enum", "extends", "false", "final", "finally", "for"
							,  "if", "in", "is", "new", "null", "rethrow", "return", "super"
							, "switch", "this", "throw", "true", "try", "var", "void", "while"
							, "with"  ]
			}
			dart_keyword_1 {
				keywords [ 	  "abstract", "as", "assert", "deferred"
							, "dynamic", "export", "external", "factory", "get"
							, "implements", "import", "library", "operator", "part", "set", "static"
							, "typedef" ]
			}
			dart_keyword_2 {
				keywords [ "async", "async*", "await", "sync*", "yield", "yield*" ]
			}
			dart_builtin_types {
				keywords [ "num", "String", "bool", "int", "double", "List", "Map" ]
			}
		}
		rule __dart_singlelinedoc_comment {
			default dart_doc
			dart_doc_reference {
				single_line "[" => "]"
			}
		}
		rule __dart_multilinedoc_comment {
			default dart_doc
			dart_doc_reference {
				single_line "[" => "]"
			}
		}
		rule __dart_singleline_comment {
			default dart_single_line_comment
		}
		rule __dart_multiline_comment {
			default dart_multi_line_comment
		}
		rule __dart_string {
			default dart_string
			dart_string_inter {
				single_line "${" => "}"
				//TODO We need a $ => IDENTIFIER_CHAR rule
			}
		}
	}
	integration {
		javafx {
			java "at.bestsolution.sample.code.generated"
		}
	}

}

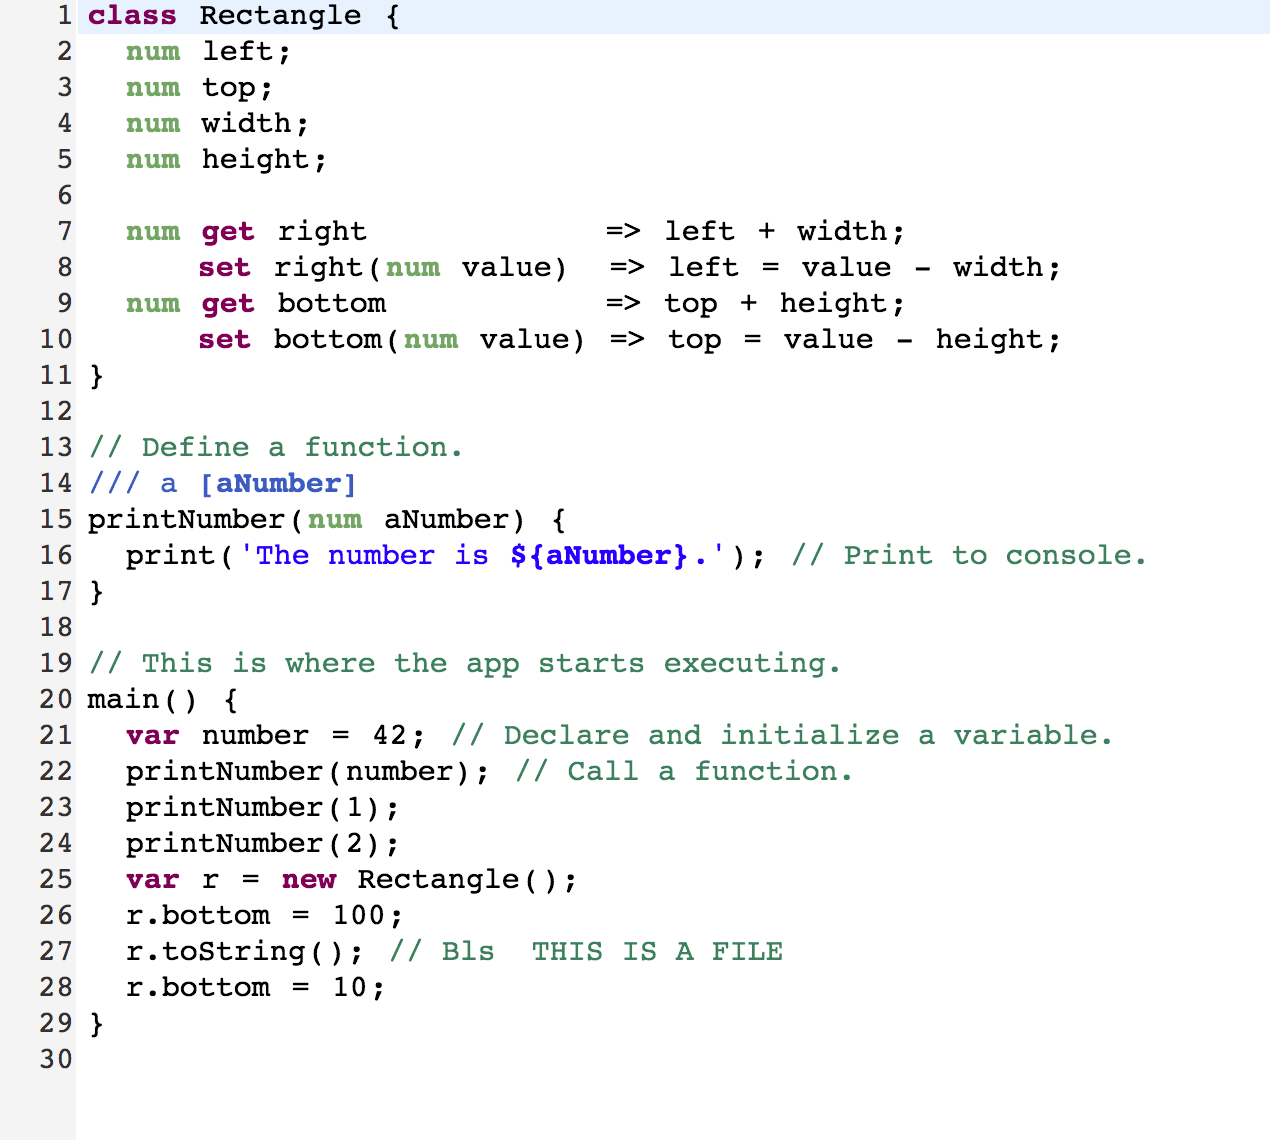
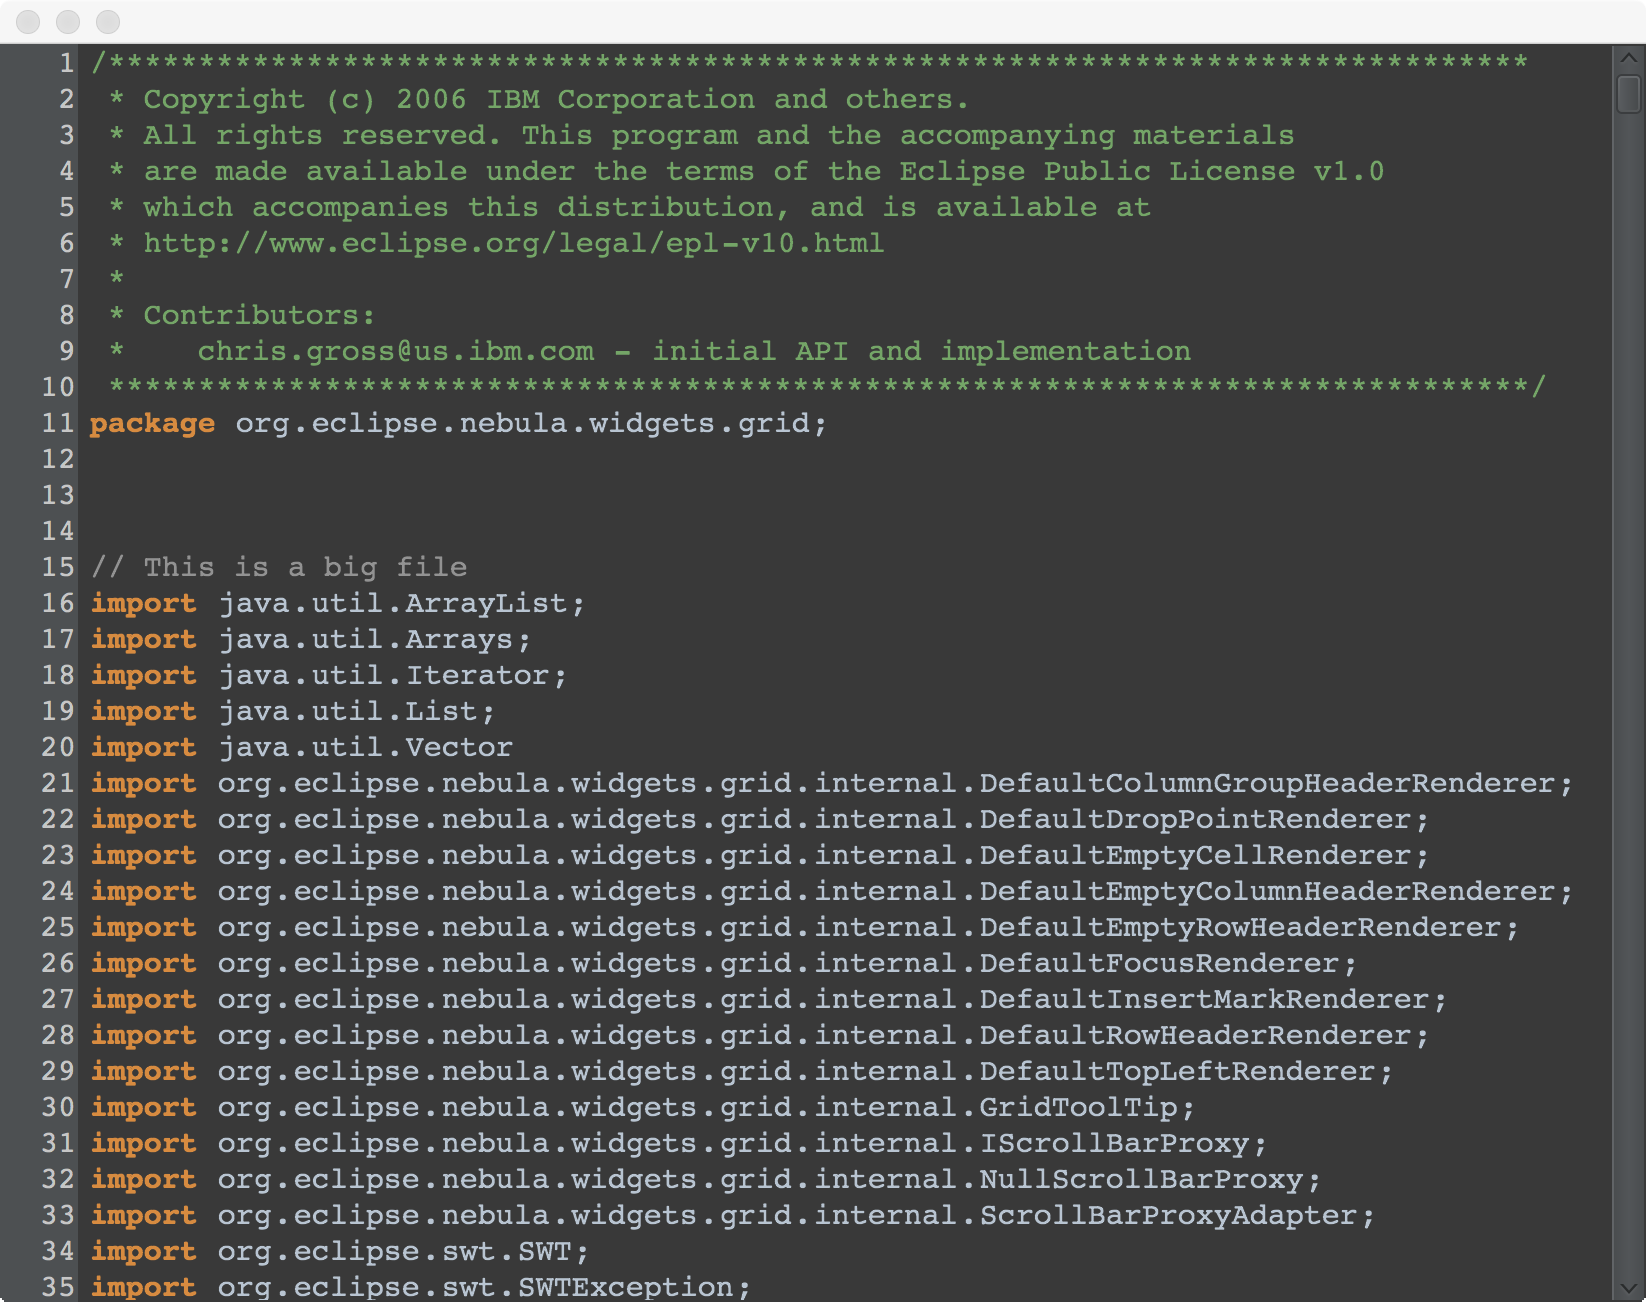
I won’t explain most of the files content because I’ve done that already in the last blog post “Defining source editors with a DSL” but in brief it holds the paritioning and tokenizing rules required to provide lexical highlighting for Google Dart.

The only new section is:

package org.eclipse.fx.code.dart

dart {
....
	integration {
		javafx {
			java "at.bestsolution.sample.code.generated"
		}
	}

}

This section holds the configuration for the code generator. In our case we instruct it to generate some java code for us and your project explorer should show something similar to this.

parser_stuff

For us the 2 most important classes are:

  • DartPartitioner: This one is responsible for partitioning your source file into eg comment-sections, code-sections, string-sections, …
  • DartPresentationReconciler: This one is responsible to tokenize the different partitions eg to create keyword-tokens, ….

Step 5: Setup an editor control

Now that the parsing infrastructure is in place we can create our setup for the editor control. For that we create a new class “DartEditor” in “at.bestsolution.sample.code” and make it extend “org.eclipse.fx.code.editor.fx.TextEditor“.

package at.bestsolution.sample.code;

import org.eclipse.fx.code.editor.StringInput;

public class DartEditor extends TextEditor {
	public DartEditor(StringInput input) {
		setInput(input);
		setDocument(new InputDocument(input));
		setPartitioner(new DartPartitioner());
		setSourceViewerConfiguration(
			new DefaultSourceViewerConfiguration(input, new DartPresentationReconciler(), null, null, null)
		);
	}
}

The above is the minimal configuration you need when creating an editor:

  • org.eclipse.fx.code.editor.Input: Is the abstraction for the retrieving and storing the content eg on the filesystem, …
  • org.eclipse.jface.text.Document: Is the text buffer behind the text editor
  • org.eclipse.jface.text.IDocumentPartitioner: The component responsible to partition the source file
  • org.eclipse.jface.text.source.SourceViewerConfiguration: The component responsible for syntax highlighting, error displaying and auto-completion

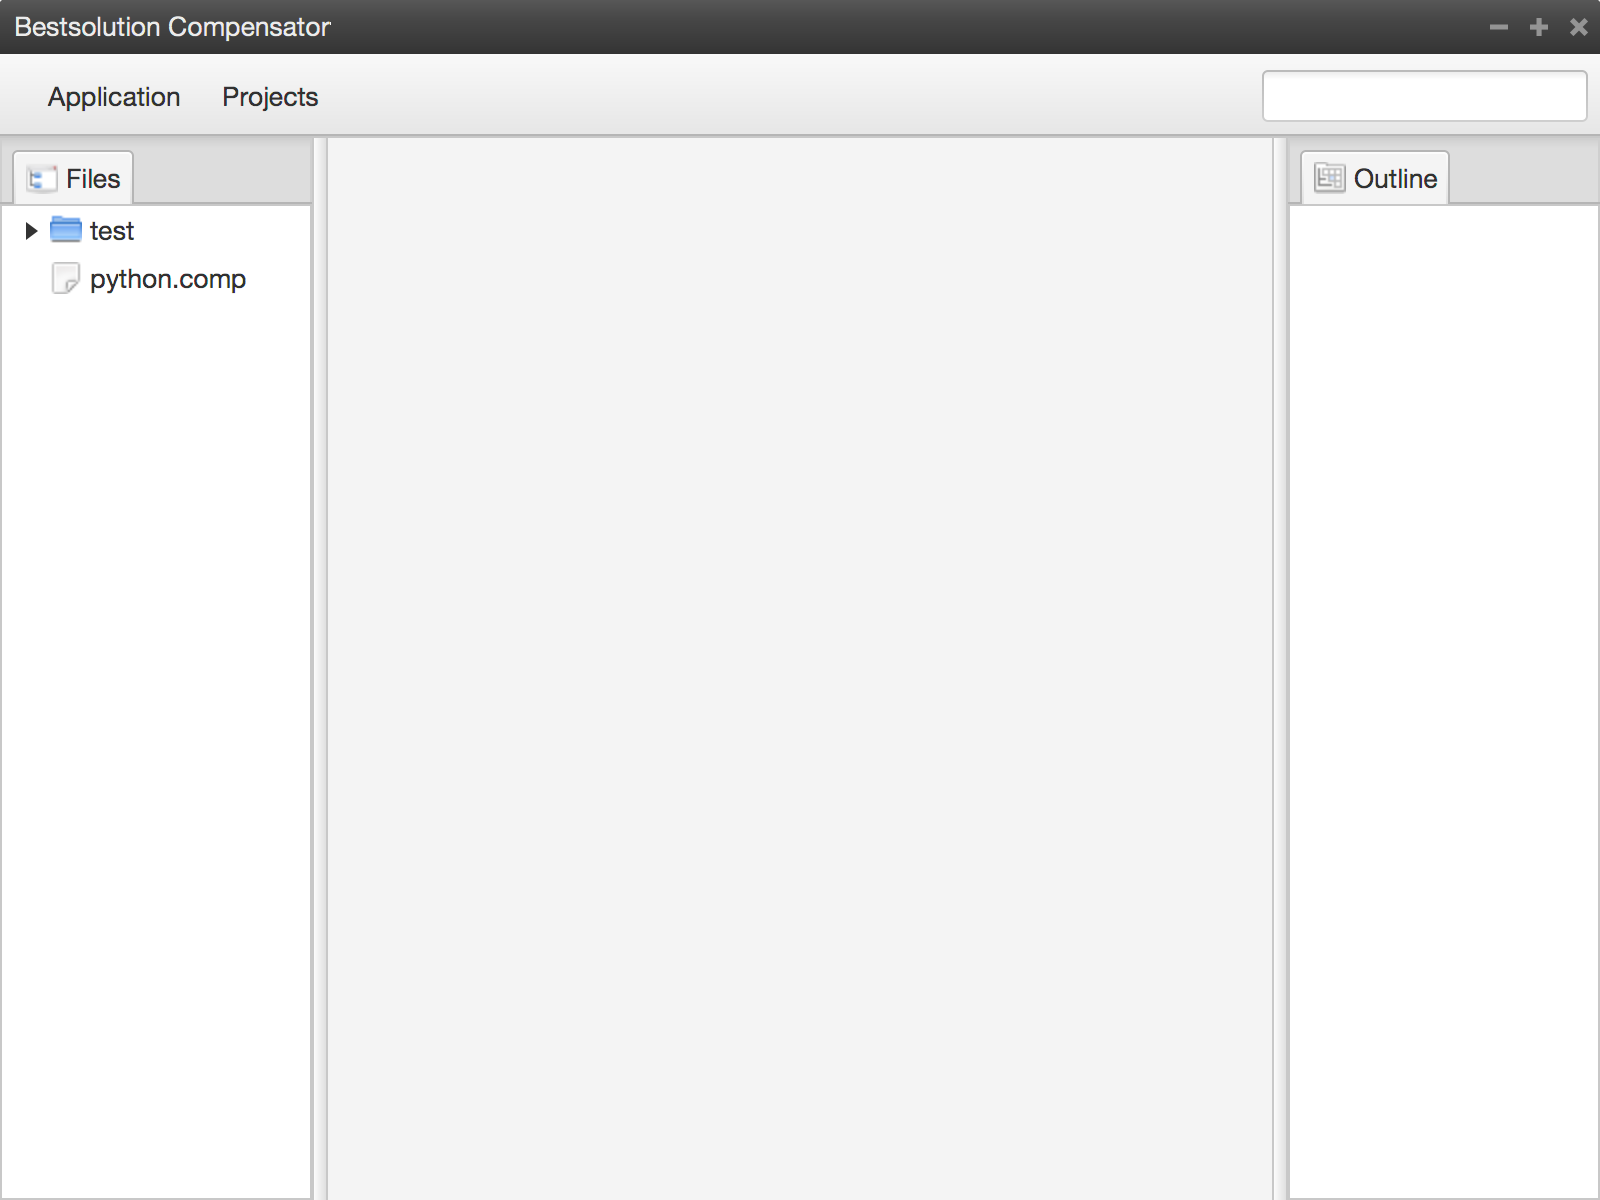
The final application

Now that we have an editor component we can build our final application which needs to have a filesystem browser on the left and a tab folder with editors on the right.

package at.bestsolution.sample.code;

import java.io.File;
import java.nio.charset.StandardCharsets;
import java.nio.file.Path;
import java.nio.file.Paths;

import org.eclipse.fx.code.editor.SourceFileInput;
import org.eclipse.fx.ui.controls.filesystem.FileItem;
import org.eclipse.fx.ui.controls.filesystem.ResourceEvent;
import org.eclipse.fx.ui.controls.filesystem.ResourceItem;
import org.eclipse.fx.ui.controls.filesystem.ResourceTreeView;

import javafx.application.Application;
import javafx.beans.binding.Bindings;
import javafx.beans.binding.StringExpression;
import javafx.beans.property.ReadOnlyBooleanProperty;
import javafx.collections.FXCollections;
import javafx.event.ActionEvent;
import javafx.scene.Scene;
import javafx.scene.control.Menu;
import javafx.scene.control.MenuBar;
import javafx.scene.control.MenuItem;
import javafx.scene.control.Tab;
import javafx.scene.control.TabPane;
import javafx.scene.input.KeyCode;
import javafx.scene.input.KeyCodeCombination;
import javafx.scene.input.KeyCombination;
import javafx.scene.layout.BorderPane;
import javafx.stage.DirectoryChooser;
import javafx.stage.Stage;

public class DartEditorSample extends Application {

	private TabPane tabFolder;
	private ResourceTreeView viewer;

	static class EditorData {
		final Path path;
		final DartEditor editor;

		public EditorData(Path path, DartEditor editor) {
			this.path = path;
			this.editor = editor;
		}
	}

	@Override
	public void start(Stage primaryStage) throws Exception {
		BorderPane p = new BorderPane();
		p.setTop(createMenuBar());

		viewer = new ResourceTreeView();
		viewer.addEventHandler(ResourceEvent.openResourceEvent(), this::handleOpenResource);
		p.setLeft(viewer);

		tabFolder = new TabPane();
		p.setCenter(tabFolder);

		Scene s = new Scene(p, 800, 600);
		s.getStylesheets().add(getClass().getResource("default.css").toExternalForm());

		primaryStage.setScene(s);
		primaryStage.show();
	}

	private MenuBar createMenuBar() {
		MenuBar bar = new MenuBar();

		Menu fileMenu = new Menu("File");

		MenuItem rootDirectory = new MenuItem("Select root folder ...");
		rootDirectory.setOnAction(this::handleSelectRootFolder);

		MenuItem saveFile = new MenuItem("Save");
		saveFile.setAccelerator(new KeyCodeCombination(KeyCode.S,KeyCombination.META_DOWN));
		saveFile.setOnAction(this::handleSave);


		fileMenu.getItems().addAll(rootDirectory, saveFile);

		bar.getMenus().add(fileMenu);

		return bar;
	}

	private void handleSelectRootFolder(ActionEvent e) {
		DirectoryChooser chooser = new DirectoryChooser();
		File directory = chooser.showDialog(viewer.getScene().getWindow());
		if( directory != null ) {
			viewer.setRootDirectories(
					FXCollections.observableArrayList(ResourceItem.createObservedPath(Paths.get(directory.getAbsolutePath()))));
		}
	}

	private void handleSave(ActionEvent e) {
		Tab t = tabFolder.getSelectionModel().getSelectedItem();
		if( t != null ) {
			((EditorData)t.getUserData()).editor.save();
		}
	}

	private void handleOpenResource(ResourceEvent<ResourceItem> e) {
		e.getResourceItems()
			.stream()
			.filter( r -> r instanceof FileItem)
			.map( r -> (FileItem)r)
			.filter( r -> r.getName().endsWith(".dart"))
			.forEach(this::handle);
	}

	private void handle(FileItem item) {
		Path path = (Path) item.getNativeResourceObject();

		Tab tab = tabFolder.getTabs().stream().filter( t -> ((EditorData)t.getUserData()).path.equals(path) ).findFirst().orElseGet(() -> {
			return createAndAttachTab(path, item);
		});
		tabFolder.getSelectionModel().select(tab);
	}

	private Tab createAndAttachTab(Path path, FileItem item) {
		BorderPane p = new BorderPane();
		DartEditor editor = new DartEditor(new SourceFileInput(path, StandardCharsets.UTF_8));
		editor.initUI(p);

		ReadOnlyBooleanProperty modifiedProperty = editor.modifiedProperty();
		StringExpression titleText = Bindings.createStringBinding(() -> {
			return modifiedProperty.get() ? "*" : "";
		}, modifiedProperty).concat(item.getName());

		Tab t = new Tab();
		t.textProperty().bind(titleText);
		t.setContent(p);
		t.setUserData(new EditorData(path, editor));
		tabFolder.getTabs().add(t);
		return t;
	}

	public static void main(String[] args) {
		Application.launch(args);
	}
}

The last thing that needs to be done is to fill the “at/bestsolution/sample/code/default.css” with life:

.styled-text-area .list-view {
	-fx-background-color: white;
}

.styled-text-area .dart.dart_default {
	-styled-text-color: rgb(0, 0, 0);
}

.styled-text-area .dart.dart_operator {
	-styled-text-color: rgb(0, 0, 0);
}

.styled-text-area .dart.dart_bracket {
	-styled-text-color: rgb(0, 0, 0);
}

.styled-text-area .dart.dart_keyword {
	-styled-text-color: rgb(127, 0, 85);
	-fx-font-weight: bold;
}

.styled-text-area .dart.dart_keyword_1 {
	-styled-text-color: rgb(127, 0, 85);
	-fx-font-weight: bold;
}

.styled-text-area .dart.dart_keyword_2 {
	-styled-text-color: rgb(127, 0, 85);
	-fx-font-weight: bold;
}

.styled-text-area .dart.dart_single_line_comment {
	-styled-text-color: rgb(63, 127, 95);
}

.styled-text-area .dart.dart_multi_line_comment {
	-styled-text-color: rgb(63, 127, 95);
}

.styled-text-area .dart.dart_string {
	-styled-text-color: rgb(42, 0, 255);
}

.styled-text-area .dart.dart_string_inter {
	-styled-text-color: rgb(42, 0, 255);
	-fx-font-weight: bold;
}

.styled-text-area .dart.dart_builtin_types {
	-styled-text-color: #74a567;
	-fx-font-weight: bold;
}

.styled-text-area .dart.dart_doc {
	-styled-text-color: rgb(63, 95, 191);
}

.styled-text-area .dart.dart_doc_reference {
	-styled-text-color: rgb(63, 95, 191);
	-fx-font-weight: bold;
}
Posted in e(fx)clipse | 19 Comments

Defining source editors with a DSL

As of today it is quite cumbersome to define source editors who are built on top of the Eclipse Text Framework.

In the upcoming 2.1 release of e(fx)clipse we’ll ship a first set of components making it dead simple to define editors for e4 on JavaFX applications (adding support for Eclipse 4.x and e4 on SWT would be possible in future as well).

One of the central components of the new code editing support is a DSL who allows you define all relevant parts of your code editor (as of 2.1 it only deals with lexical syntax highlighting).

This blog explains the definition of a source editor for Google Dart. Follow up blog posts will make use of the definition created in this post to build a complete editor like this:

editor

Overview

Let’s start from the bottom up:

The following file defines the complete setup required for a source code editor with syntax highlighting stored in a file named “dart.ldef”

package org.eclipse.fx.code.dart.text

dart {
	partitioning {
		partition __dftl_partition_content_type
		partition __dart_singlelinedoc_comment
		partition __dart_multilinedoc_comment
		partition __dart_singleline_comment
		partition __dart_multiline_comment
		partition __dart_string
		rule {
			single_line __dart_string "'" => "'"
			single_line __dart_string '"' => '"'
			single_line __dart_singlelinedoc_comment '///' => ''
      			single_line __dart_singleline_comment '//' => ''
      			multi_line __dart_multilinedoc_comment '/**' => '*/'
      			multi_line  __dart_multiline_comment '/*' => '*/'
		}
	}
	lexical_highlighting {
		rule __dftl_partition_content_type whitespace javawhitespace {
			default dart_default
			dart_operator {
				character [ ';', '.', '=', '/', '\\', '+', '-', '*', '<', '>', ':', '?', '!', ',', '|', '&', '^', '%', '~' ]
			}
			dart_bracket {
				character [ '(', ')', '{', '}', '[', ']' ]
			}
			dart_keyword {
				keywords [ 	  "break", "case", "catch", "class", "const", "continue", "default"
							, "do", "else", "enum", "extends", "false", "final", "finally", "for"
							,  "if", "in", "is", "new", "null", "rethrow", "return", "super"
							, "switch", "this", "throw", "true", "try", "var", "void", "while"
							, "with"  ]
			}
			dart_keyword_1 {
				keywords [ 	  "abstract", "as", "assert", "deferred"
							, "dynamic", "export", "external", "factory", "get"
							, "implements", "import", "library", "operator", "part", "set", "static"
							, "typedef" ]
			}
			dart_keyword_2 {
				keywords [ "async", "async*", "await", "sync*", "yield", "yield*" ]
			}
			dart_builtin_types {
				keywords [ "num", "String", "bool", "int", "double", "List", "Map" ]
			}
		}
		rule __dart_singlelinedoc_comment {
			default dart_doc
			dart_doc_reference {
				single_line "[" => "]"
			}
		}
		rule __dart_multilinedoc_comment {
			default dart_doc
			dart_doc_reference {
				single_line "[" => "]"
			}
		}
		rule __dart_singleline_comment {
			default dart_single_line_comment
		}
		rule __dart_multiline_comment {
			default dart_multi_line_comment
		}
		rule __dart_string {
			default dart_string
			dart_string_inter {
				single_line "${" => "}"
				//TODO We need a $ => IDENTIFIER_CHAR rule
			}
		}
	}
}

As you note the file is split in 2 big sections.

package org.eclipse.fx.code.dart.text

dart {
	partitioning {
		
	}
	lexical_highlighting {

	}
}
  • partitioning: this section defines how different partitions in your file can be identified. Most likely you have partitions for the code, comments, … but eventually it is up to you
  • lexical_highlighting: this sections defines how a partition is tokenized to eg highlight keywords, operators, …

Partitioning

partitioning {
	partition __dftl_partition_content_type
	partition __dart_singlelinedoc_comment
	partition __dart_multilinedoc_comment
	partition __dart_singleline_comment
	partition __dart_multiline_comment
	partition __dart_string
	rule {
		single_line __dart_string "'" => "'"
		single_line __dart_string '"' => '"'
		single_line __dart_singlelinedoc_comment '///' => ''
      		single_line __dart_singleline_comment '//' => ''
      		multi_line __dart_multilinedoc_comment '/**' => '*/'
      		multi_line  __dart_multiline_comment '/*' => '*/'
	}
}

The partitioning section starts with a list of all available partitions. At least the __dftl_partition_content_type is required but for dart we define:

  • __dftl_partition_content_type: This probably the most important section because this is where all your code is going to
    class Rectangle {
      num left;   
      num top; 
      num width; 
      num height; 
      
      num get right             => left + width;
          set right(num value)  => left = value - width;
      num get bottom            => top + height;
          set bottom(num value) => top = value - height;
    }
    
  • __dart_singlelinedoc_comment: A single line documentary comment
    /// This is single line doc [aNumber]
    printNumber(num aNumber) {}
    
  • __dart_multilinedoc_comment: A multi line documentary comment
    /**
     * A multi line document comment [aNumber]
     */
    printNumber(num aNumber) {}
    
  • __dart_singleline_comment: A single line comment
    var a = 12; // Single line comment
    
  • __dart_multiline_comment: A multi line comment
    /*
     * A multi line comment
     */
    var a = 12;
    
  • __dart_string:
    var a = 0;
    var s1 = 'A string ${a} with interpolation';
    var s2 = "A string ${a} with interpolation";
    

Once the list of partitions is defined we need to define the rules used to identify the partitions. As of now we support 2 rule types:

  • Single line rule: rule starts if start sequence is detected and ends with a line break or if the end sequence is found
    single_line __dart_singleline_comment '//' => ''
    
  • Multi line rule: rule starts if start sequence is detected and rule ends with the end of file or if the end sequence is found
    multi_line  __dart_multiline_comment '/*' => '*/'
    

Lexical highlighting

lexical_highlighting {
	rule __dftl_partition_content_type whitespace javawhitespace {
		default dart_default
		dart_operator {
			character [ ';', '.', '=', '/', '\\', '+', '-', '*', '<', '>', ':', '?', '!', ',', '|', '&', '^', '%', '~' ]
		}
		dart_bracket {
			character [ '(', ')', '{', '}', '[', ']' ]
		}
		dart_keyword {
			keywords [ 
				"break", "case", "catch", "class", "const", "continue", "default"
				, "do", "else", "enum", "extends", "false", "final", "finally", "for"
				,  "if", "in", "is", "new", "null", "rethrow", "return", "super"
				, "switch", "this", "throw", "true", "try", "var", "void", "while"
				, "with"  ]
		}
		dart_keyword_1 {
			keywords [ 	  
				"abstract", "as", "assert", "deferred"
				, "dynamic", "export", "external", "factory", "get"
				, "implements", "import", "library", "operator", "part", "set", "static"
				, "typedef" ]
			}
		dart_keyword_2 {
			keywords [ "async", "async*", "await", "sync*", "yield", "yield*" ]
		}
		dart_builtin_types {
			keywords [ "num", "String", "bool", "int", "double", "List", "Map" ]
		}
	}
	rule __dart_singlelinedoc_comment {
		default dart_doc
		dart_doc_reference {
			single_line "[" => "]"
		}
	}
	rule __dart_multilinedoc_comment {
		default dart_doc
		dart_doc_reference {
			single_line "[" => "]"
		}
	}
	rule __dart_singleline_comment {
		default dart_single_line_comment
	}
	rule __dart_multiline_comment {
		default dart_multi_line_comment
	}
	rule __dart_string {
		default dart_string
		dart_string_inter {
			single_line "${" => "}"
			//TODO We need a $ => IDENTIFIER_CHAR rule
		}
	}
}

As you note for each partition from above we define how we split this is into tokens (eg dart_default, dart_keyword, …) so that we can color them differently eg keywords, … .

We currently support the following tokenizer rules

  • character: This rule allows to define single value tokens like operators, block definitions, …
    dart_bracket {
    	character [ '(', ')', '{', '}', '[', ']' ]
    }
    
  • keywords: This rule allows to define a list of keywords
    dart_keyword {
    	keywords [ "break", "case", "catch", "class", "const", "continue", "default", ... ]
    }
    
  • single_line: This rule starts with the start sequence and ends with a new line or if the end sequence is matched
    dart_doc_reference {
    	single_line "[" => "]"
    }
    
  • multi_line: This rule starts with the start sequence and ends with an EOF or if the end sequence is matched. We don’t require this rule for dart

From the token to the colored string

Now that we have defined how we want our sourcecode to be tokenized we need the final step. Defining what a token “dart_keyword” means in the UI. For JavaFX we simply map the token names into JavaFX CSS class selectors.

.styled-text-area .dart.dart_default {
	-styled-text-color: rgb(0, 0, 0);
}

.styled-text-area .dart.dart_operator {
	-styled-text-color: rgb(0, 0, 0);
}

.styled-text-area .dart.dart_bracket {
	-styled-text-color: rgb(0, 0, 0);
}

.styled-text-area .dart.dart_keyword {
	-styled-text-color: rgb(127, 0, 85);
	-fx-font-weight: bold;
}

.styled-text-area .dart.dart_keyword_1 {
	-styled-text-color: rgb(127, 0, 85);
	-fx-font-weight: bold;
}

.styled-text-area .dart.dart_keyword_2 {
	-styled-text-color: rgb(127, 0, 85);
	-fx-font-weight: bold;
}

.styled-text-area .dart.dart_single_line_comment {
	-styled-text-color: rgb(63, 127, 95);
}

.styled-text-area .dart.dart_multi_line_comment {
	-styled-text-color: rgb(63, 127, 95);
}

.styled-text-area .dart.dart_string {
	-styled-text-color: rgb(42, 0, 255);
}

.styled-text-area .dart.dart_string_inter {
	-styled-text-color: rgb(42, 0, 255);
	-fx-font-weight: bold;
}

.styled-text-area .dart.dart_builtin_types {
	-styled-text-color: #74a567;
	-fx-font-weight: bold;
}

.styled-text-area .dart.dart_doc {
	-styled-text-color: rgb(63, 95, 191);
}

.styled-text-area .dart.dart_doc_reference {
	-styled-text-color: rgb(63, 95, 191);
	-fx-font-weight: bold;
}

The rule to make up the selector is trivial. Let’s for example look at:

.styled-text-area .dart.dart_keyword {
	-styled-text-color: rgb(127, 0, 85);
	-fx-font-weight: bold;
}
...
dart {
	lexical_highlighting {
		rule __dftl_partition_content_type whitespace javawhitespace {
			dart_keyword {
				...
			}
		}
	}
}
...
  • .styled-text-area: Selector to narrow the window where the real token selector is applicable
  • .dart.dart_keyword: Selector made up from the language name (dart) and the token name (dart_keyword)
Posted in e(fx)clipse | 9 Comments

Eclipse Democamp Season – JavaFX smart code editors (eg for Google Dart)

I once more could not resist but showed up at 3 Democamps (Vienna, Munich and Zürich) where I showed how you can reassemble the components from our compensator research to create a smart code editor for Google Dart with:
* Syntax highlighting
* Error reporting
* Auto completion

The slides from my talk are available at Slideshare

or if you prefer it as a PDF

If you’ve some time to spare and want to see me coding a smart editor for Google Dart in 15 Minutes you can watch the recording of the session in Vienna (the interesting part starts at around minute 15 of the video)

Posted in e(fx)clipse | 2 Comments

e(fx)clipse 2.0 – Is released

I’m a bit late to announce the release of e(fx)clipse 2.0 but I’ve been heads down in e4/JavaFX projects so I did not yet have time to blog about the release in detail.

Where to get it from

Naturally we provide p2 update sites:

We also updated our All-In-One builds where we also bundled:

New Features / APIs

The main focus of the release clearly was on the runtime layer where we fixed 119 Bugzilla-Tickets (most of the enhancements). Below is a list of the more interesting ones.

Updateing your application got a lot easier

To put it in kind words the p2-API is a very low-level and noisy one allowing you to do crazy stuff but frankly all you really want is to request an update for your application. So this should be damn easy. With 2.0 we made it dead simple for you:

  • Tooling: The new application wizard allows you to directly bootstrap an application who has all necessary bits to update through p2
    p2-wizard
  • Runtime: We have had a unfunctional implementation which we revised (big thank to Dirk Fauth)
    import org.eclipse.e4.core.di.annotations.Execute
    import org.eclipse.fx.core.update.UpdateService;
    import org.eclipse.fx.core.update.UpdateService.UpdatePlan;
    import org.eclipse.fx.core.update.UpdateService.UpdateResult;
    
    import java.util.Optional;
    
    import org.eclipse.fx.core.ProgressReporter;
    import org.eclipse.fx.core.StatusException;
    
    public class RequestUpdate {
    	@Execute
    	public void update(UpdateService service) {
    		service
    			.checkUpdate(ProgressReporter.NULLPROGRESS_REPORTER)
    			.onComplete(this::onCheckComplete)
    			.onException(this::onException);
    	}
    	
    	private void onCheckComplete(Optional<UpdatePlan> updatePlan) {
    		if (updatePlan.isPresent()) {
    			updatePlan.get().runUpdate(ProgressReporter.NULLPROGRESS_REPORTER)
    				.onComplete(this::onUpdateSuccess)
    				.onException(this::onException);
    		} else {
    			// Show nothing to update
    		}
    	}
    	
    	private void onUpdateSuccess(UpdateResult result) {
    		// Inform that the update has finished
    	}
    	
    	private void onException(StatusException updatePlan) {
    		// Show info that status update failed
    	}
    }
    

New styled text APIs

In case you’ve seen me at demo camps, EclipseCon and XtextCon you noticed that we have put a lot of time into the StyledTextArea which we reworked internally a lot and so things like selection, … are working properly now! The nice side effect of the reworking of StyledTextArea internals is that we managed to factor out internal into reuseable small APIs.

  • StyledString: A java.lang.CharSequence who is made up of StyledStringSegments who have style classes associated with them
  • StyledLabel: Similar API to javafx.scene.control.Label allowing you to represent a StyledString in the scenegraph
  • StyledTextNode: A scenegraph node who is able to show arbitary decorations on a text string
  • StyledTextLayoutContainer: A scenegraph node who is able to display selections
  • SimpleTreeCell & SimpleListCell: Got enhanced to supported StyledString if the CharSequence provided by the labelExtractorFunction is a StyledString

The following screenshots shows some of them working together to present an Dart-Editor
screen-text

In the center is the StyledTextArea, the autocompletion dialog uses SimpleListCell and the outline view the SimpleTreeCell.

FilterableTreeItem & SortableTreeItem

Our UI-Library got 2 now TreeItem implementations who support filtering and sorting! The most remarkable thing is that they have not been developed by BestSolution.at but Christoph Keimel has contributed them!

Get in control of the e4 window WITHOUT providing a custom renderer

Previous version had very limited support for controling your window. Starting with 2.0 we provide a (provisional) API who allows you to control almost anything from your window! For that we developed an abstract window API (org.eclipse.fx.ui.controls.stage.Frame) and also ship some default implementations (eg org.eclipse.fx.ui.controls.stage.DefaultTrimmedWindowPane).

In the screenshot below we’ve relocated the MenuBar into a HBox with a search field at the end to save vertical space

screen-custom

Lightweight dialogs

Based on the Frame/Window API who is used in the renderer code in a heavy weight fashion we also have a new lightweight dialog system who is built around this API beside a base org.eclipse.fx.ui.controls.dialog.Dialog class we ship 2 implementations people we most likely use very frequently:

  • TitleAreaDialog
    screen-title-dialog
  • MessageDialog
    screen-message-dialog

e4 supports lightweight dialogs

While the lightweight dialog API can be used by any application, e4 applications can make use of lightweight dialogs through a new service named org.eclipse.fx.ui.services.dialog.LightWeightDialogService so opening a dialog who takes the complete window can be done with:

@Execute
public void openDialog(LightWeightDialogService service) {
    MyDialog d = new MyDialog();
    service.openDialog(d, ModalityScope.WINDOW);
}

While the dialog service allows to open a dialog and control it’s modality there’s a 2nd service who is able to control how a dialog is shown/hidden. By default the dialog is simply show and hidden but you can for example add some nice animations like shown in the video below.

Posted in Announcements, e(fx)clipse | 2 Comments

Code editors in general with JavaFX

Yesterday I did a short demo on how one can build code editors with JavaFX while the talk was at Xtextcon most information apply to any code editor you may want to develop with the runtime components developed as part of e(fx)clipse.

I’ve uploaded the slides to slideshare

The important point is that all this is plain Java! No OSGi involved so eg the Java-Sample I showed looks like this:

public class SampleJavaCode extends Application {
  private final static String[] LEGAL_CONTENT_TYPES = new String[] { 
    IJavaPartitions.JAVA_DOC,
    IJavaPartitions.JAVA_MULTI_LINE_COMMENT, 
    IJavaPartitions.JAVA_SINGLE_LINE_COMMENT,
    IJavaPartitions.JAVA_STRING, IJavaPartitions.JAVA_CHARACTER };

  private int count = 0;

  @Override
  public void start(Stage primaryStage) throws Exception {
    BorderPane container = new BorderPane();
    Document document = new Document();
    document.set(
      Util.getFileContent(getClass().getClassLoader().getResource("Sample_big.txt").toURI()));

    JavaSourceConfiguration configuration = new JavaSourceConfiguration();

    SourceViewer viewer = new SourceViewer();

    FastPartitioner partitioner = new FastPartitioner(new FastJavaPartitionScanner(), LEGAL_CONTENT_TYPES);
    document.setDocumentPartitioner(configuration.getConfiguredDocumentPartitioning(viewer), partitioner);
    partitioner.connect(document);

    viewer.configure(configuration);
    viewer.setDocument(document);
    container.setCenter(viewer.getTextWidget());

    Scene s = new Scene(container);
    s.getStylesheets().add(getClass().getResource("dark.css").toExternalForm());
    primaryStage.setScene(s);
    primaryStage.show();
  }

  public static void main(String[] args) {
    Application.launch(args);
  }
}

and looks like this:

bright.css:
blog_screen1

dark.css:
blog_screen2

All sources for the stuff I presented are available in the e(fx)clipse git repository – watch out for projects starting with “org.eclipse.fx.xtext”.

Posted in Uncategorized | 4 Comments

Lightweight Dialogs in e4 & JavaFX

I’ve just checked in the initial bits to use lightweight dialogs in your e4 + JavaFX applications. You can see it in action in the short video from below

Useage is fairly simple. First you need to have dialog implementation like this:

static class OpenProjectDialogImpl extends TitleAreaDialog {
  private ListView<Project> list;
  private final CommandService cmdService;

  @Inject
  public OpenProjectDialogImpl(Workbench workbench, 
    CommandService cmdService, @Service List<ProjectService> projectServiceList) {

    super("Open project", 
      "Open project", "Open an existing project");
    this.cmdService = cmdService;
    addDefaultButtons();
    setMaxWidth(500);
    setMaxHeight(500);
    setId("open-project-dialog");
		
    list = new ListView<>();
    list.setMinWidth(600);
    list.setCellFactory(v -> 
      new SimpleListCell<Project>( 
        p -> labelExtractor(p, projectServiceList), 
        p -> cssProvider(p,projectServiceList)));
    list.setItems(FXCollections.observableArrayList(
      workbench.getProjectList()));
    setClientArea(list);
  }
	
  @Override
  protected void handleOk() {
    if( list.getSelectionModel().getSelectedItem() != null ) {
      cmdService.execute("org.eclipse.fx.code.compensator.app.command.openproject", Collections.singletonMap("projectId", list.getSelectionModel().getSelectedItem().getProjectId()));
      super.handleOk();	
    }
  }
}

and displaying it is nothing more than:

public class OpenProjectDialog {
  @Execute
  public void open(LightWeightDialogService dialogService) {
    dialogService.openDialog(OpenProjectDialogImpl.class, ModalityScope.WINDOW);
  }
}

As you can see in the video you can choose how the dialog is opened & closed. This is done through an OSGi-Service of type LightweightDialogTransitionService:

@Component
public class FadeDialogTranstionServiceImpl extends FadeDialogTranstionService implements LightweightDialogTransitionService {
  @Override
  protected void configureFadeIn(FadeTransition transition) {
    super.configureFadeIn(transition);
    transition.setInterpolator(Interpolator.EASE_OUT);
  }
	
  @Override
  protected void configureFadeOut(FadeTransition transition) {
    super.configureFadeOut(transition);
    transition.setInterpolator(Interpolator.EASE_OUT);
  }
}
Posted in e(fx)clipse | 4 Comments

Storing custom UI-State in e4+JavaFX

I guess many e4 developers asked:

How do I restore custom UI-State?

Most likely answer they get is:

Use persistedState of org.eclipse.e4.ui.model.application.MApplicationElement who is a Map<String,String>

What a bad bad idea! This makes your nice UI code who uses dependency inject depend on the e4 application model! What a bad bad idea!

For all users of e4 & JavaFX I’m glad there’s a solution now named org.eclipse.fx.core.Memento who allows you to store simple and complex states without getting a dependency on the e4 framework:

public class MyPart {
  @PostConstruct
  public void init(Memento state) {
    int selectionId = state.get("selectionId",-1);
    ComplexObjectState complexState = state.get("complexObject",null);
  }
 
  @PersistState
  public void saveUIState(Memento state) {
    state.put("selectionId",getSelectionId());
    state.put("complexObject",getComplexObject(),ObjectSerializer.JAXB_SERIALIZER);
  }
}

For more information on the cool stuff you get from e4 & JavaFX visit our wiki.

Posted in e(fx)clipse | Tagged , | 2 Comments

Compensator – A code editor and a code dev environment written in JavaFX

If you’ve followed the release of e(fx)clipse 1.2.0 and my latest blogs on this, you might have noticed that we have spent quite some time on components like a styled text editor, a filesystem viewer and other basic stuff one needs to build a code editor application.

e(fx)clipse Compensator – a simple code editor

The reason for that was, that we have simultaneously been working on a project named Compensator.

Compensator is a code editor/framework which supports syntax highlighting and outline views for (programming) languages like Java, JavaScript, Groovy, XML, … while not providing high-level features like auto-completion, error-reporting and such fancy things. Stripping of those features allows Compensator to work directly with the filesystem, not requiring the core.resources-plugin from the Eclipse IDE.

The following video should provide you first glance at it

Let’s summarize the basic features introduced in the video above:

  • Compensator is a lightweight editor application which does not require the creation
    of a workspace, project, etc. … which the Eclipse IDE does
  • Compensator comes (as of now) with syntax highlighting support for
    Java, JavaScript, Groovy, XML
  • Compensator supports (as of now) basic outline view for Java and
    JavaScript
  • Compensator is themeable and includes (as of now) a bright and dark
    theme

e(fx)clipse Compensator – an extensible code editor

While syntax highlighting for the above listed languages is supported in Compensator by default (more to come hopefully in future), you might want to enable this support also for other languages. As this should be as trivial as possible – and at least not require a PhD from the MIT – we designed Compensator to allow contributing highlighting definitions in the following ways:

  • (for specific cases) Java code & CSS: we kept the code as close as the one you write for the Eclipse IDE
  • (the preferred way) through a DSL named hsl & CSS: The DSL makes is easy to define highlightings and even allows you to install them on the fly e.g. for python it looks like this python

The 2nd area the basic code editor application is extensible at is the outline view for JavaScript. JavaScript itself has no specified way of defining what you call a class-definition in the Java world so many frameworks came up with their own idea how to define a “class”, import other class/components, … . To make sense of an outline view an editor has to understand these different concepts. As a proof-of-concept we implemented a custom outline for Qooxdoo.

The following video demonstrates both of those features

It is important to note that Compensator is NOT designed to be indefinitely extensible like the Eclipse IDE! If you want something different then take the building blocks and assemble your own editor/development environment!

e(fx)clipse compensator – a code development environment

As Compensator was introduced above as a light weight code editor, which comes with basic syntax highlighting and outline support, I can say this was only half of the truth. Compensator also has support you expect from an advanced code development environment with the following featureset:

  • autocompletion and error reporting (as of today for Java and soon JavaScript)
  • VCS integration (as of today git)
  • Bugtracker integration (as of today github)
  • CI-System integration (as of today travis)

The following video demonstrates the basic interactions and features you’ll get:

Before I describe some of the ideas we had in mind when creating the UI I’d like to define what the term “Project” means to Compensator:

A project is a business process unit which is made up of a set of source-modules, vcs-repositories, bugtrackers and common integration jobs doing the build and tests on your behalf.

I guess the UI without a main toolbar is fairly controversial, but we
are certain in development processes this toolbar (like e.g. in the
Eclipse IDE) is not too much used as keyboard shortcuts or the usage of
Quick Access are the more effective options here.

The project explorer (on the left side) is the center of user interaction, holding all relevant information on the project:

  • the (nested) module structure of your project including the sources
  • bugtrackers configured for the project
  • CI-systems configured to build the project (when sources are
    checked-in)
  • VCS-repositories configured for the project and allowing you to commit the sources

In Compensator we payed a lot of attention on tightly integrating these four outlined development services/components with each other (somehow similar to what mylyn & egit add to the Eclipse IDE). The video above highlights this integration only between the editor, the bugtracker and the version control system but we plan to extend this tight integration to other project type needs as well e.g. to control your Heroku or OpenShift application when developing for a SaaS platform.

The technologies at play

As many of you are developers we thought you might be interested in the technology mix we used to implement Compensator.

  • Equinox as the OSGi-Container
  • e4 as the application framework
  • e(fx)clipse e4 runtime layer providing support for JavaFX
  • e(fx)clipse runtime components and controls
  • Eclipse Text Framework for text partitioning and tokenizing
  • e(fx)clipse port of JFace-Text components to present the tokenized stuff as editors
  • Oracle Nashorn JavaScript parser to get an AST for JavaScript files
  • Eclipse JDT to get an AST for Java files, background compilation, error reporting and auto-completion
  • Eclipse JGit for git integration
  • Eclipse EGit Github REST API

EclipseCon NA 2015

Interested in developing applications like this? Just drop us a note and/or maybe we can have a brief meeting/talk at EclipseCon NA 2015 in the second week of March. Or just come to my talk on Thursday March 12th 12:00 … you can be sure, I will have cool stuff with me, like RCP applications with animated 3d models, Compensator – the “Back-to-the-roots-code-development-environment” and other cool things.

Posted in e(fx)clipse | 12 Comments

How to create an editor with syntax highlighting for Java

I see many people at stackoverflow who ask for an editor who does syntax highlighting in their JavaFX applications. As e(fx)clipse runtime has such a control available and the Eclipse Text Framework has all the tokenizing and reconcoling infrastructure I thought it might be a good idea to write up how you can get an application like this which is plain old Java application (NO OSGi required!)

bright

drak

To get this going you need to:

You can now start studying the code in the CodeEditor project. Most of the hard work is done by the libraries for you so in general doing syntax highlighting with the help of e(fx)clipse runtime components involve the following (custom) code:

  • Implementation of IPresentationDamager and IPresentationRepairer
  • Implementation of an ITokenScanner
  • Implementation of an IDocumentPartitioner
  • A CSS-File to style the tokens

This sounds hard than it really is because 95% of the code already available e.g. in Eclipse JDT can be reused (notice the copyright header in all the text-package classes!), I won’t go into the details about the Eclipse Text framework in this post as I’m not an expert myself on it.

The only thing I’d like you to show is how you connect all the text parsing with the JavaFX control coming from e(fx)clipse.

public SourceViewer createViewer(Path p) {
  SourceViewer viewer = new SourceViewer();
  SourceViewerConfiguration configuration = createConfig();
  Document document = createDocument(p);
  IDocumentPartitioner partitioner = createPartitioner();

  document.setDocumentPartitioner(configuration.getConfiguredDocumentPartitioning(viewer), partitioner);

  document.setDocumentPartitioner(partitioner);
  partitioner.connect(document);

  viewer.configure(configuration);
  viewer.setDocument(document);
  return viewer;
}

private SourceViewerConfiguration createConfig() {
  return new JavaSourceConfiguration();
}

private IDocumentPartitioner createPartitioner() {
  return new FastPartitioner(new FastJavaPartitionScanner(), new String[] { 
    IJavaPartitions.JAVA_DOC,
    IJavaPartitions.JAVA_MULTI_LINE_COMMENT, 
    IJavaPartitions.JAVA_SINGLE_LINE_COMMENT,
    IJavaPartitions.JAVA_STRING, IJavaPartitions.JAVA_CHARACTER });
}

private Document createDocument(Path p) {
  return new Document(getFile(p));
}

private String getFile(Path p) {
  try (BufferedReader reader = Files.newBufferedReader(p)) {
    StringBuilder b = new StringBuilder();
    String line;
    while ((line = reader.readLine()) != null) {
      b.append(line + "\n");
    }
    reader.close();
    return b.toString();
  } catch (IOException e) {
    // TODO Auto-generated catch block
    e.printStackTrace();
  }
  return "";
}

if you’ve ever written an styled-text editor for Eclipse the above code should look fairly familiar to you.

and to do the highlighting you need to attach a CSS-Stylesheet like this:

.java.styled-text-area .selection-marker {
	-fx-background-color: #2b5696;
}

.java.styled-text-area .java_string {
	-styled-text-color: #7c986c;
}

.java.styled-text-area .java_default {
	-styled-text-color: #b8c4d1;
}

.java.styled-text-area .java_annotation {
	-styled-text-color: rgb(200, 200, 200);
}

.java.styled-text-area .java_keyword {
	-styled-text-color: #d78b40;
	-fx-font-weight: bold;
}

.java.styled-text-area .java_operator {
	-styled-text-color: #b8c4d1;
}

.java.styled-text-area .java_bracket {
	-styled-text-color: #b8c4d1;
}

.java.styled-text-area .java_keyword_return {
	-styled-text-color: #d78b40;
	-fx-font-weight: bold;
}

.java.styled-text-area .java_comment_task_tag {
	-styled-text-color: rgb(127, 159, 191);
}

.java.styled-text-area .java_doc_link {
	-styled-text-color: #74a567;
	-fx-font-weight: bold;
}

.java.styled-text-area .java_doc_default {
	-styled-text-color: #74a567;
}

.java.styled-text-area .java_multi_line_comment {
	-styled-text-color: #929292;
}

.java.styled-text-area .java_single_line_comment {
	-styled-text-color: #929292;
}

.java.styled-text-area .java_doc_tag {
	-fx-fill: #74a567;
	-fx-font-weight: bold;
}
Posted in e(fx)clipse | 8 Comments

e(fx)clipse 1.2.0 released

Before going into the weekend and work on my EclipseCon stuff I’m happy to announce the 1.2.0 release of e(fx)clipse tooling and runtime.

Tooling

e(fx)clipse adds JavaFX tooling to your Eclipse IDE and provides:

  • FXML editor including a live preview
  • CSS editor who knows all JavaFX properties and provides auto-complete and validation
  • (and many many more features)

The tooling is known to work on:

  • Eclipse Luna SR1/2
  • Eclipse Mars M5

You can install the tooling into your IDE using the following p2 repository.

Runtime platform

e(fx)clipse comes with a powerful runtime platform built on top of the Eclipse 4 Application but uses JavaFX for rendering instead of SWT. The e(fx)clipse runtime platform is production ready and used in a number of commerical products.

In case you need SLAs, consulting and commercial support please get in touch with BestSolution.

The runtime artifacts are publised as:

The runtime platform is using Eclipse Luna SR1 as its base and adds many many cool features on top of it. If you are interested in some highlights coming with 1.2.0 release please use this link

Next release 2.0

1.2.0 is the last public release of 1.x series unless something very serious shows up until the next scheduled release 2.0 which will be shipped as part of Mars Release Train.

For customers with service contracts additional releases with backports of bugfixes will be available through BestSolution channels if requested. If you are using e(fx)clipse in your commercial products get in touch with us.

Posted in e(fx)clipse | Tagged | 12 Comments