Fairly everything in e(fx)clipse is done with DS-Services when you run in an OSGi-Environment.
Still many of them don’t have any dependency on OSGi at all so most components we have can also run/get used in an ordinary Java-Environment (see the blog post about the code editor framework as an example). Since the beginning we published some of them through the ServiceLoader-API (and we’ll still keep it for those) but that has the draw back that you can not express relations between services.
Tonight I had a crazy idea: Could I read the DS-Component-Registration files in an none-OSGi environment and wire services together without using the ServiceLoader-API.
The result is JavaDSServiceProcessor. Our public service lookup API has been retrovited to use this internal service instead of ServiceLoader so if one now eg looks up our AdapterService like this:
import org.eclipse.fx.core.Util;
import org.eclipse.fx.core.adapter.AdapterService;

public class Test {
  public static void main(String[] args) {
    AdapterService adapterService = Util.getService(AdapterService.class).get();
  }
}
will get a fully configured AdapterService. We currently don’t support everything from the DS-Spec (eg Properties are not yet support) but I’ll fill this gap soon.
If you haven’t read my last blog post where I described the problem of letting the DI container inject an instance of ModelElementFactory directly you should do so before proceeding because it will help you understand the problem the following new concept introduced solves.
Our problem can be summerized as: To create an instance of ModelElementFactory we need information from the IEclipseContext (eg the EModelService) and the component instance the value is created for.
We can satisfy the first requirement through an IContextFunction who calculates its value on demand when first requested in the context but:
an IContextFunction calculates the value ONLY once per context (technically this is not true because if you reparent an IEclipseContext the value is recalculated)
because of 1. it does not provide information for which component (object type) the value is created
We also can not use @Creatable – which by the way was the worst idea ever in the history of Eclipse DI – because the type seen by the injector is only the interface (ModelElementFactory) and not the concrete type.
So what can be done?
At first we need something that provides the information what real type we should create an instance for a given interface and guess what there’s a service API in org.eclipse.fx.core named TypeTypeProviderService so if we want to teach the framework that it should create an instance of ModelElementFactoryImpl if someone request ModelElementFactory we’d register an OSGi-Service like this:
class ModelElementFactoryImpl implements ModelElementFactory {
  @Inject
  public ModelElementFactoryImpl(EModelService modelService, @Named(TypeTypeProviderService.DI_KEY) Class<?> ownerType) {
    // ...
  }
}

@Component
class ModelElementFactoryTypeProvider implements TypeTypeProviderService<ModelElementFactory> {
  public boolean test(Class<?> clazz) {
    return clazz == ModelElementFactory.class;
  }

  public Class<? extends ModelElementFactory> getType(Class<?> clazz) {
    return ModelElementFactoryImpl.class;
  }
}
and for the consumer we need a new annotation who informs the DI-Container to search a bit harder for the value to inject
class Component {
  @Inject
  public Component(@LocalInstance ModelElementFactory factory) {
    // ...
  }
}
In last blog post I talked about the problem that people (including me!) often forget to set the contributorURI of the MApplicationElement instance which could lead to problems.
So with the next release of e(fx)clipse there’s a new service called ModelElementFactory who does the initialization for you and has some other nice features.
Let’s see how we can create model instances:
import org.eclipse.fx.ui.workbench.services.ModelService;
import org.eclipse.fx.ui.workbench.services.ModelService.ModelElementFactory;
import org.eclipse.e4.ui.workbench.modeling.EModelService;

class Handler {
   @Execute
   public void createPart(EModelService eModelService, ModelService modelService) {
     ModelElementFactory factory = modelService.createModelElementFactory(getClass(),eModelService);
     MPart part = factory.createModelElement(MPart.class); // Creates the instance and sets the contributorURI
     // ...
   }
}
You might ask why does one have to create the service instance through the ModelService as the factory and the problem is that:
we need the EModelService-Instance
we need access to the owner of the final element which we can only extract from the caller-class
While 1. can be worked around with the an IContextFunction the 2nd problem is not easy to solve (although it can be solved and I’ll introduce the solution in an upcoming blog post)
So the first API provided solves our basic usecase of creating application model elements but there’s more
Post processing of created instances
MPart part = factory.createModelElement(MPart.class, this::fillPart);

private MPart fillPart(MPart part) {
  // initialize the part
}
Creation of Supplier instances you can pass around
class Handler {
   @Execute
   public void createPart(EModelService eModelService, ModelService modelService) {
     ModelElementFactory factory = modelService.createModelElementFactory(getClass(),eModelService);
     Supplier<MPart> part = factory.createModelElementCreator(MPart.class, this::fillPart)
     // ...
   }
}

public class EditorOpener {
    public void createOrSelectPart(MPartStack stack, String elementId, Supplier<MPart> partCreator) {
      // do some logic eg detecting of the elementId already exists

      MPart part = partCreator.get();
      partStack.getChildren().add(part);
      return part;
    }
}
All Eclipse 4 applications (from the Eclipse 4.x IDE to your simple e4 RCP) leverage the Eclipse 4 application model who is a representation of your whole application in a well defined and typesafe EMF-Model (you can somehow compare it to your browsers DOM).
The model itself is not static but a so called live model and you can interact with it through your preferred VM-Language eg to add new elements. One of the things done most often is to programmatically add MPart instances to represent your UI-Component.
The code below is taken from the e(fx)clipse code editor component library
public static class DefaultEditorOpener implements EditorOpener {
  @Inject
  EModelService modelService;

  @Inject
  @Service
  List<FileIconProvider> fileIconProvider;

  @Override
  public boolean openEditor(String uri) {
    // .....
    MPart part = modelService.createModelElement(MPart.class);
    part.setCloseable(true);
    part.setLabel(URI.create(uri).lastSegment());
    part.setContributionURI("bundleclass://org.eclipse.fx.code.editor.fx/org.eclipse.fx.code.editor.fx.TextEditor");
    part.setContributorURI("platform:/plugin/org.eclipse.fx.code.editor.fx.e4");

    String iconUri = fileIconProvider
      .stream()
      .filter( f -> f.test(uri))
      .findFirst()
      .map( f -> f.getFileIconUri(uri))
      .orElse("platform:/plugin/org.eclipse.fx.code.editor.fx.e4/icons/file_16.png");
    part.setIconURI(iconUri);
    part.getPersistedState().put(Constants.DOCUMENT_URL, uri);
    part.getTags().add(EPartService.REMOVE_ON_HIDE_TAG);
    // .....
  }
}
While most of the code is straight forward most developers stumble upon the 2 very similar MPart attributes:
contributionURI: URI to identify the class that is responsible to create the MParts UI
contributorURI: URI to identify the bundle who create the model element
Even worse most developers only use contributionURI and never set the contributorURI value which might lead to problems for example if the value is to be translated because the information in the contributorURI is used to retrieve the ResourceBundle through the BundleLocalization-Service.
With 2.1.0 we introduced our custom @Preference annotation who is to be preferred over the one available as part of the Eclipse 4 Application Platform.
With the next nightly build there are even more reasons to use our annotation because you get even cooler features:
Support for default values
If there’s no value found in the preference store you most likely don’t want to retrieve a default value null (String), false (boolean), 0 (int & long & float & double) but a custom one. You can now define the default value in the annotation
class Component {
@Inject
@Preference(key="velocity",defaultValue="1000")
private int velocity;
}
Support for more value types
It is fairly likely that you want not only store/retrieve standard values like int, long, float, double and String but eg date or time.
class Component {
@Inject
@Preference(key="lastModified")
private java.time.Instant lastModified;
}
The support for “value types” is provided by a new service named ValueSerializer who supports the most common value types (eg values in java.time) and if you have your own types you contribute your own serializers.
Complex objects
While the above introduced support for “value types” works for things like date and time it is not unlikely that you have to remember non trivial objects like configurations the new support for complex values might get you excited
@XmlRootElement
public class Complex {
private String name;
private int value;
private List<Complex> children;

// ....
}

class Component {
@Inject
@Preference(key="complexData")
private Complex complexData;
}
Serialization and Deserialization is provided through the ObjectSerializer service
I’m happy to announce that e(fx)clipse 2.1.0 has been released today and it has a heap of new features and bugfixes (in total 49 tickets have been resolved).
The project
Starting with this release I’d like to publicly document the amount of time we spend on the project. For this 2.1.0 we spend ~150 work hours and another ~60 private hours. So if you appreciate all this we certainly welcome all donations.
In the next release cycle we’ll also setup bug bounties for often requested features like Min/Max support or detach through DnD. In case you miss something don’t be shy get in touch with us.
maven central (only parts of the runtime) under the group-id at.bestsolution.eclipse
Core libraries published on maven central
As many of our components don’t require to run in an OSGi-Environment and can be used in any application we started to publish them on maven-central.
Eclipse Platform
com.ibm.icu.base
org.eclipse.e4.core.di.annotations
org.eclipse.equinox.common
org.eclipse.jdt.annotation
e(fx)clipse
org.eclipse.text
org.eclipse.fx.core
org.eclipse.fx.ui.panes
org.eclipse.fx.ui.animation
org.eclipse.fx.ui.controls
org.eclipse.fx.core.di
org.eclipse.fx.text
org.eclipse.fx.text.ui
org.eclipse.fx.code.editor
org.eclipse.fx.code.editor.fx
Smart Code editing
If you follow this blog regularly it should not be a surprise that one of the main working areas has been to extract components from our research projects and make them available as loosely coupled components allowing one to implement code editors in a very simple way (nothing is bound to OSGi and e4!).
We ship lexical highlighters you can use in your own applications for the following languages by default:
go
dart
groovy
java
js
kotlin
php
python
rust
swift
xml
In case you are interested in using the APIs there’s a series of blogs who introduce the APIs and the tooling who makes it very easy for you to develop an editor for your favorite language or DSL:
and more blogs on this topic will follow soon. Finally it is important to understand that all the code editing APIs are declared as provisional because we need to get feedback from adopters and maybe adjust them here and there.
New APIs
There’s a bunch of new APIs available and I won’t describe all of them but the most interesting are:
@Preference / Value
While there’s a preference annotation in the e4 platform we ship our own one because the current implementation available from the platform is not working the way we expect you to develop components (hint: we expect you to write components without any dependency on OSGi and eclipse platform APIs).
And because the the annotation can make use of the adapter services who are part of the core platform you can exchange Value through javafx.beans.property.Property<T>. Read more at the wiki.
EventBus
A similar problem you face with publishing preferences or context values is to publish informations on the IEventBroker who has a compile time dependency on the OSGi-Event-Interface.
Starting with 2.1.0 we provide our own simple EventBus-API you can use instead of the IEventBroker when publishing events. In an e4 application we simply wrap the IEventBroker and none OSGi users we provide a default implementation org.eclipse.fx.core.event.SimpleEventBus.
Usage is straight forward
import static org.eclipse.fx.core.event.EventBus.data;

class MyComponent {
  private final EventBus bus;

  @Inject
  public MyComponent(EventBus bus) {
    this.bus = bus;
    this.bus.subscribe( "my/app/config/changed",
      e -> { handleConfigChange(e.getData()) } );
    // or for the cool kids
    this.bus.subscribe( "my/app/config/changed",
      data(this::handleConfigChange) );
  }

  public void publishSelection(Person p) {
    bus.publish("my/app/person/changed", p, true);
  }

  public void handleConfigChange(Config c) {
    // ...
  }

}
Adornment Graphics Node
While a similar API has been / is available as part of the e(fx)clipse e4 APIs we introduce in 2.1.0 a very similar on as part of our controls component so it can be used by none OSGi applications as well.
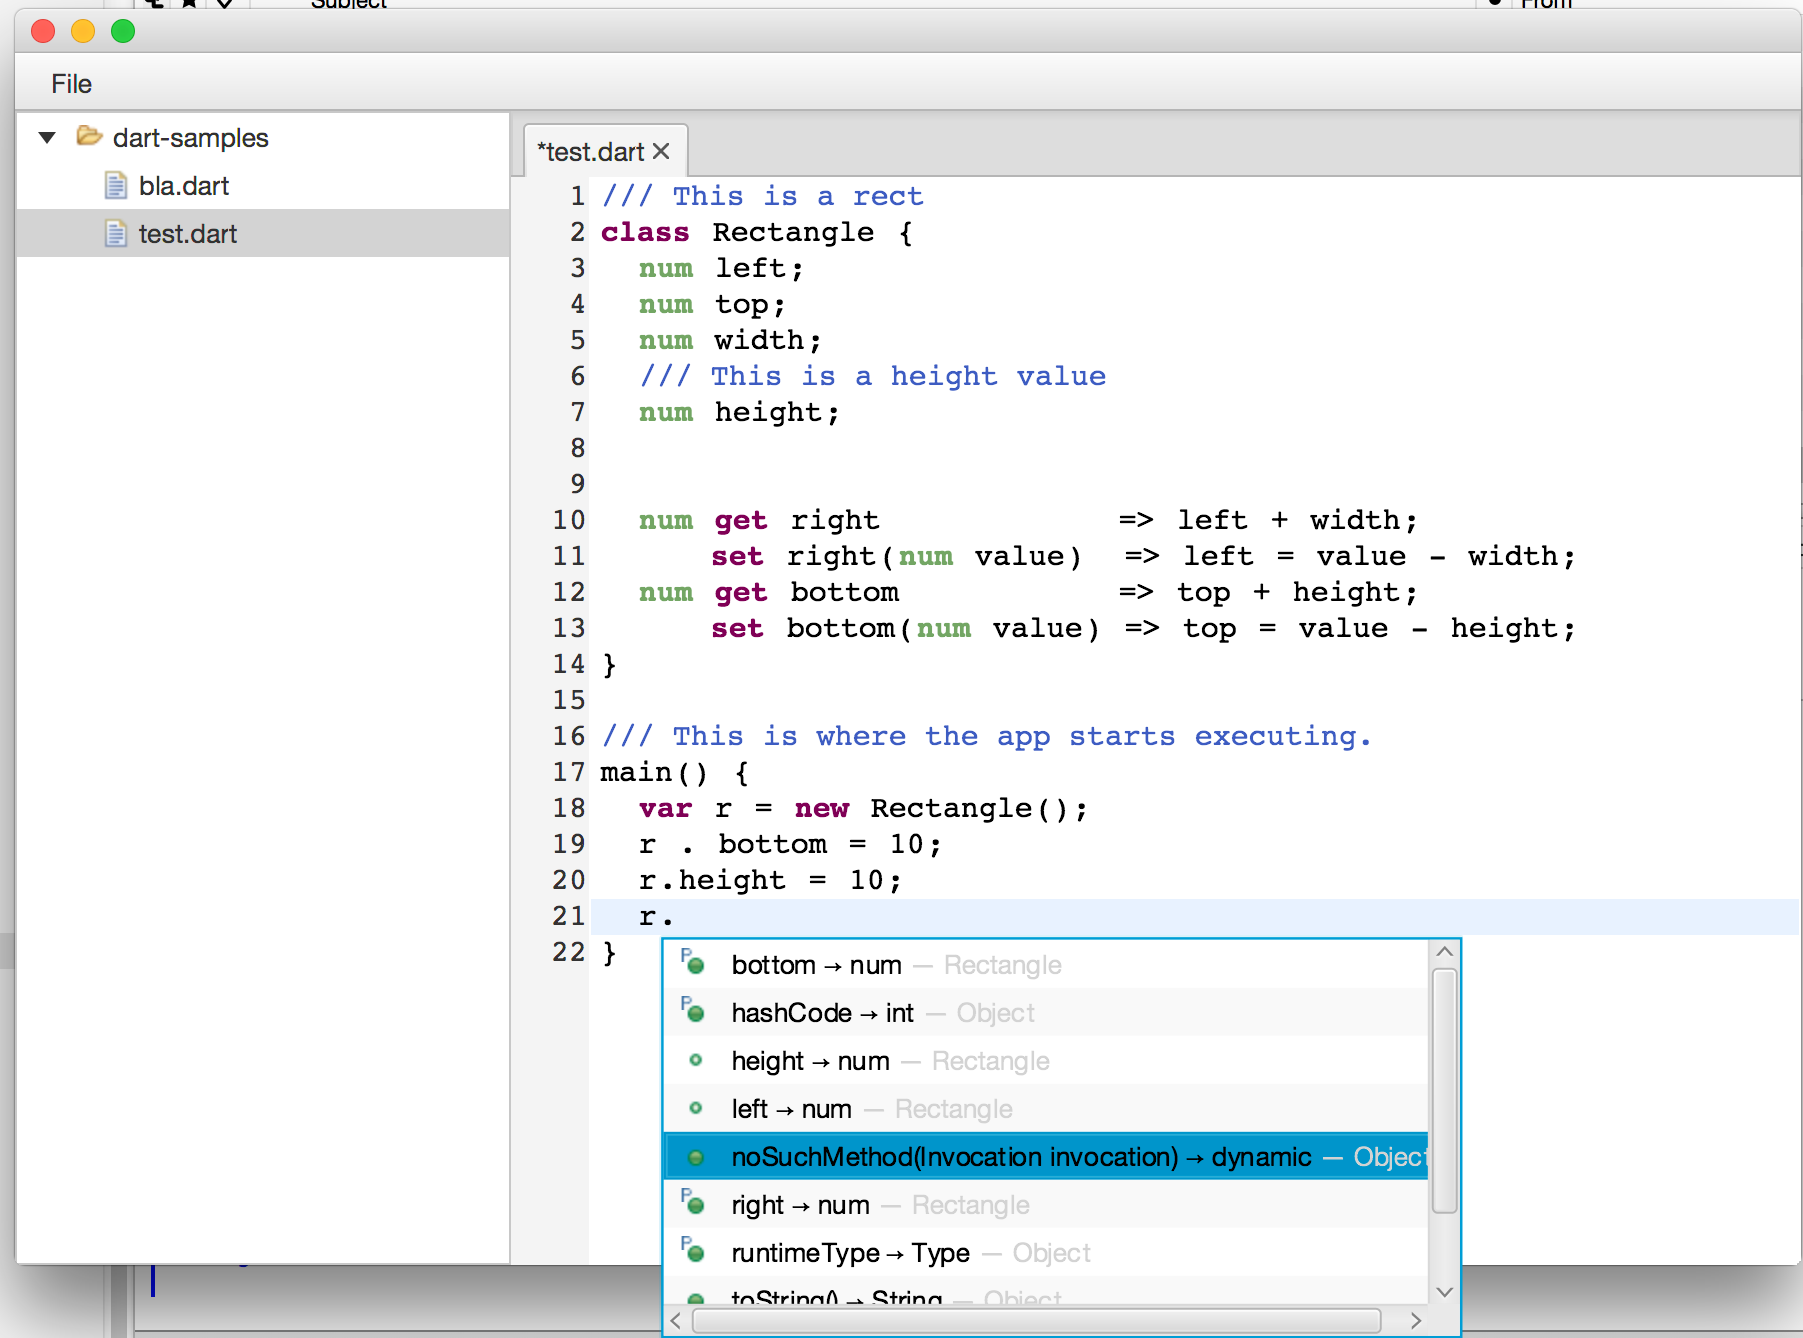
For those who ask themselves what adornments are good for the following screenshot of the dart code editor might help
The graphics shown in next to the bottom entry is not a single image but made up from
Usage is straight forward:
Image b = new Image(getClass().getResource("methpub_obj.png").toExternalForm());
Image p = new Image(getClass().getResource("property.png").toExternalForm());

AdornedGraphicNode node = new AdornedGraphicNode( b,
  Adornment.create(Location.LEFT_TOP, p) );
In my last few blogs (here, here and here) I started implementing a smart dart editor with syntax highlighting, auto complete, … for google dart.
While the first posts have been dedicated to getting syntax highlighting working we’ll now start with the higher level features you are used to from full blown IDEs.
In this first blog post we’ll look how we can interface with the Dart Analysis Server which is the reason I’ve chose dart as the example language.
The communication with the Dart Analysis is done through the input and output stream. An example will probably help.
Let’s suppose we have a /home/tomschindl/dart-samples/test.dart with the following content:
class Rectangle {
  num left;
  num top;
  num width;
  num height;

  num get right             => left + width;
      set right(num value)  => left = value - width;
  num get bottom            => top + height;
      set bottom(num value) => top = value - height;
}

// This is where the app starts executing.
main() {
  var r = new Rectangle();
  r.
}
If you now want to get all auto completetion proposals after r. you issue the following commands/requests to the server:
You launch the dart analysis server eg on my workstation it is:
I guess you get the idea – not really rocket science but in java we don’t want to deal with this low-level stuff. So as part of the editor work we also developed a Java interface for the Dart Analysis Server available from maven-central.
If we want to issue the same commands as above through the Java-API.
Create a maven-project and make the pom.xml look like this:
package at.bestsolution.dart.server.sample;

import java.io.IOException;
import java.util.stream.Stream;

import org.eclipse.fx.core.Util;

import at.bestsolution.dart.server.api.DartServer;
import at.bestsolution.dart.server.api.DartServerFactory;
import at.bestsolution.dart.server.api.Registration;
import at.bestsolution.dart.server.api.model.CompletionResultsNotification;
import at.bestsolution.dart.server.api.services.ServiceAnalysis;
import at.bestsolution.dart.server.api.services.ServiceCompletion;

public class DartServerSample {
	public static void main(String[] args) {
		// Get the server factory from the service registry
		DartServerFactory serverFactory = Util.lookupService(DartServerFactory.class);
		// Create a server instance
		DartServer server = serverFactory.getServer("server");

		// Get the analysis and completion service
		ServiceAnalysis analysisService = server.getService(ServiceAnalysis.class);
		ServiceCompletion completionService = server.getService(ServiceCompletion.class);

		// set the root
		analysisService.setAnalysisRoots(new String[] {"/Users/tomschindl/dart-samples/"}, new String[0], null);
		// register for completion notifcations
		Registration proposalRegistration = completionService.results(DartServerSample::handleHandleResults);

		// Request completion at offset 367
		completionService.getSuggestions("/Users/tomschindl/dart-samples/test.dart", 367);

		// Wait for a key press
		try {
			System.in.read();
		} catch (IOException e) {
		}

		// unregister the notification listener
		proposalRegistration.dispose();
		// shutdown the server instance
		server.dispose();
	}

	private static void handleHandleResults(CompletionResultsNotification notification) {
		Stream.of(notification.getResults()).forEach( c -> System.err.println(c.getCompletion()));
	}
}
You’ve chosen e4 and JavaFX as the technologies to implement your cool rich client application. Congrats!
In the first iteration you’ve implemented all the form UIs you need in your application which you made flashy with the help of CSS, animations for perspective switches, lightweight dialogs as introduced in e(fx)clipse 2.0, … .
In the 2nd iteration your task now might be to implement some scripting support but for that you require an editor who at least supports lexical syntax highlighting. So you now have multiple choices:
Use a WebView and use an editor written in JavaScript like Orion
Use the StyledTextArea shipped with e(fx)clipse 2.0 and implement all the hard stuff like paritioning, tokenizing, …
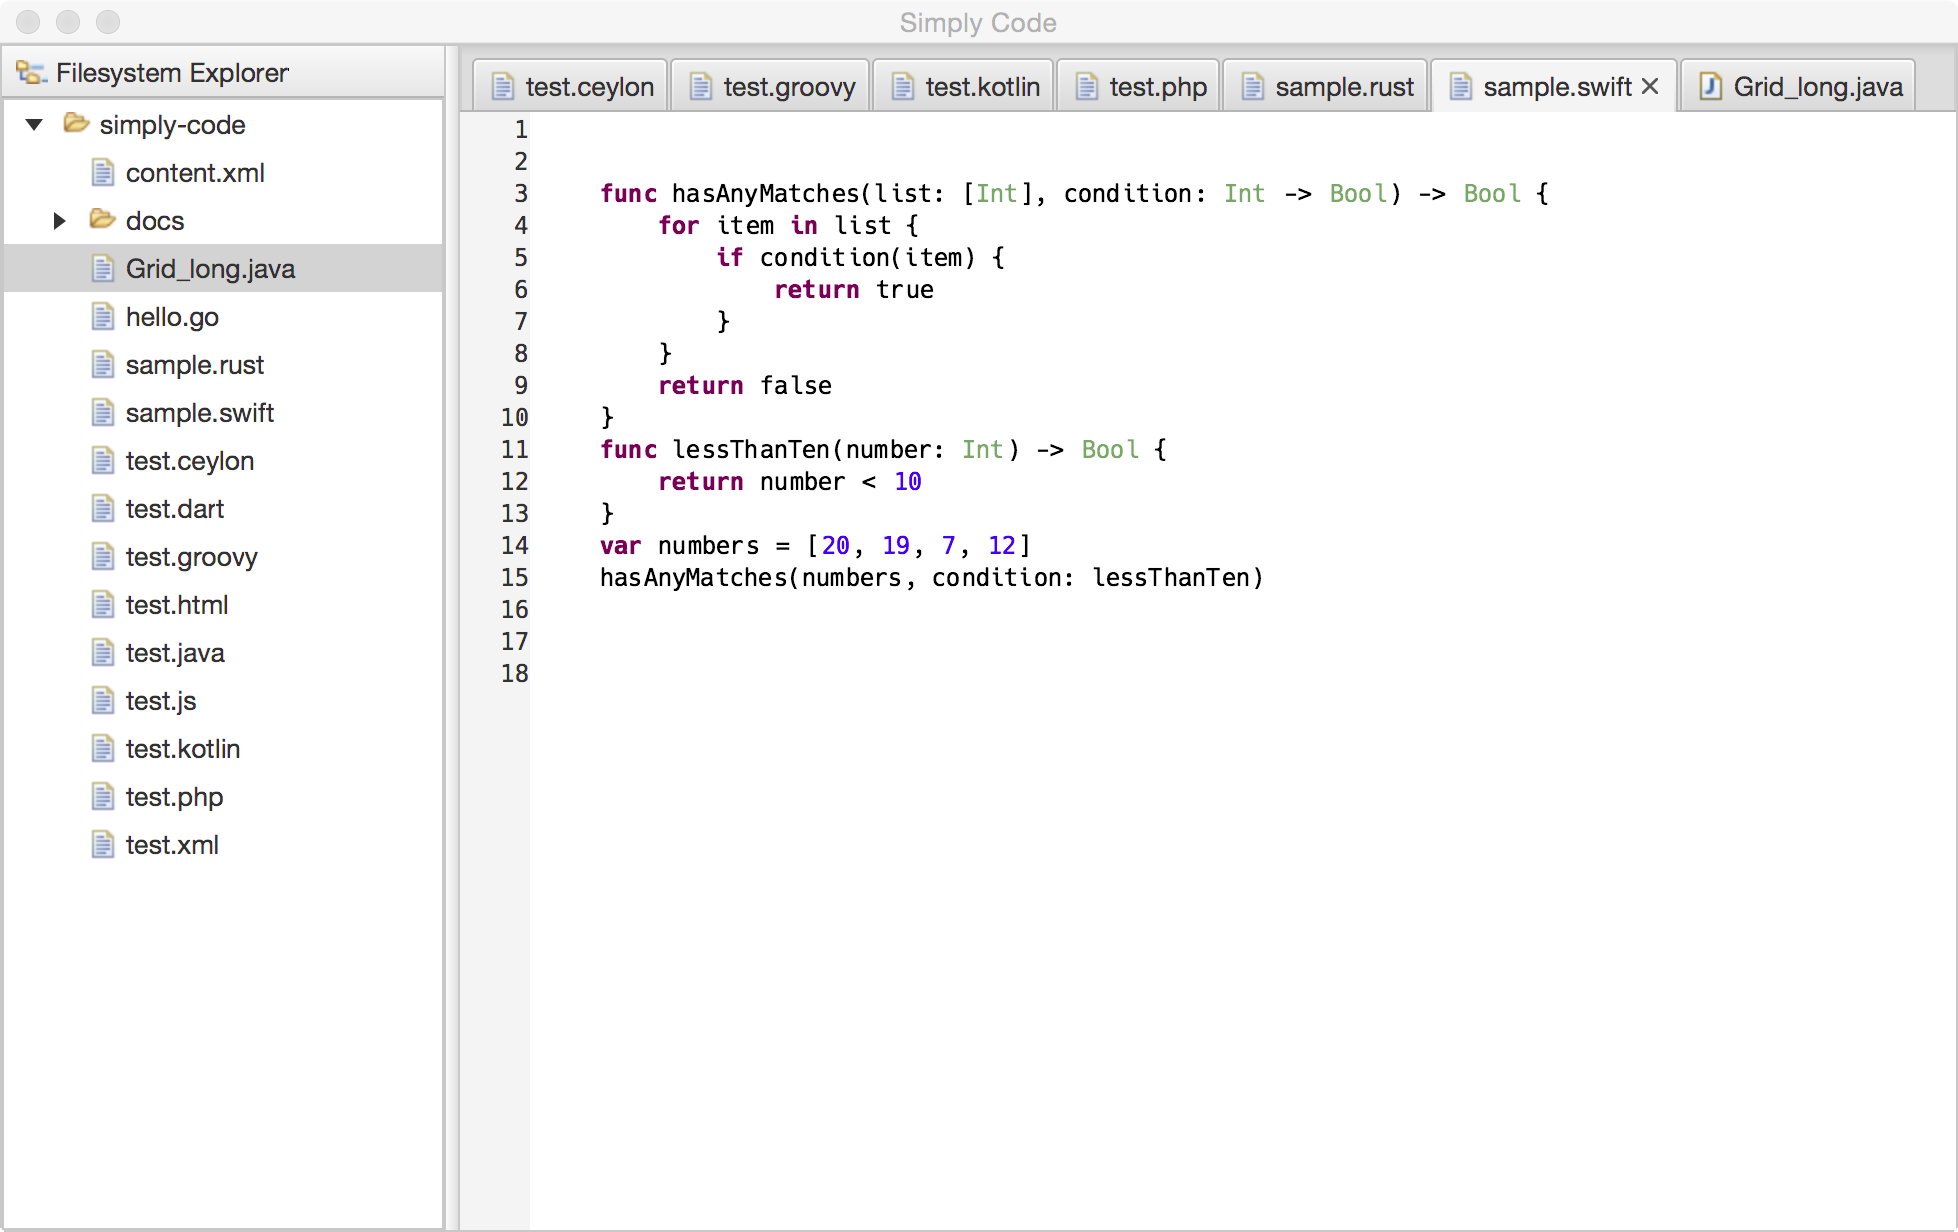
Get e(fx)clipse 2.1 and let the IDE generate the editor for you
If you decided to go with the last option the following explains how you get that going by developing a e4 JavaFX application
like shown in this video
Get e(fx)clipse 2.1.0
As of this writing e(fx)clipse 2.1 has not been released so you need to grab the nightly builds eg by simply downloading our All-in-One build.
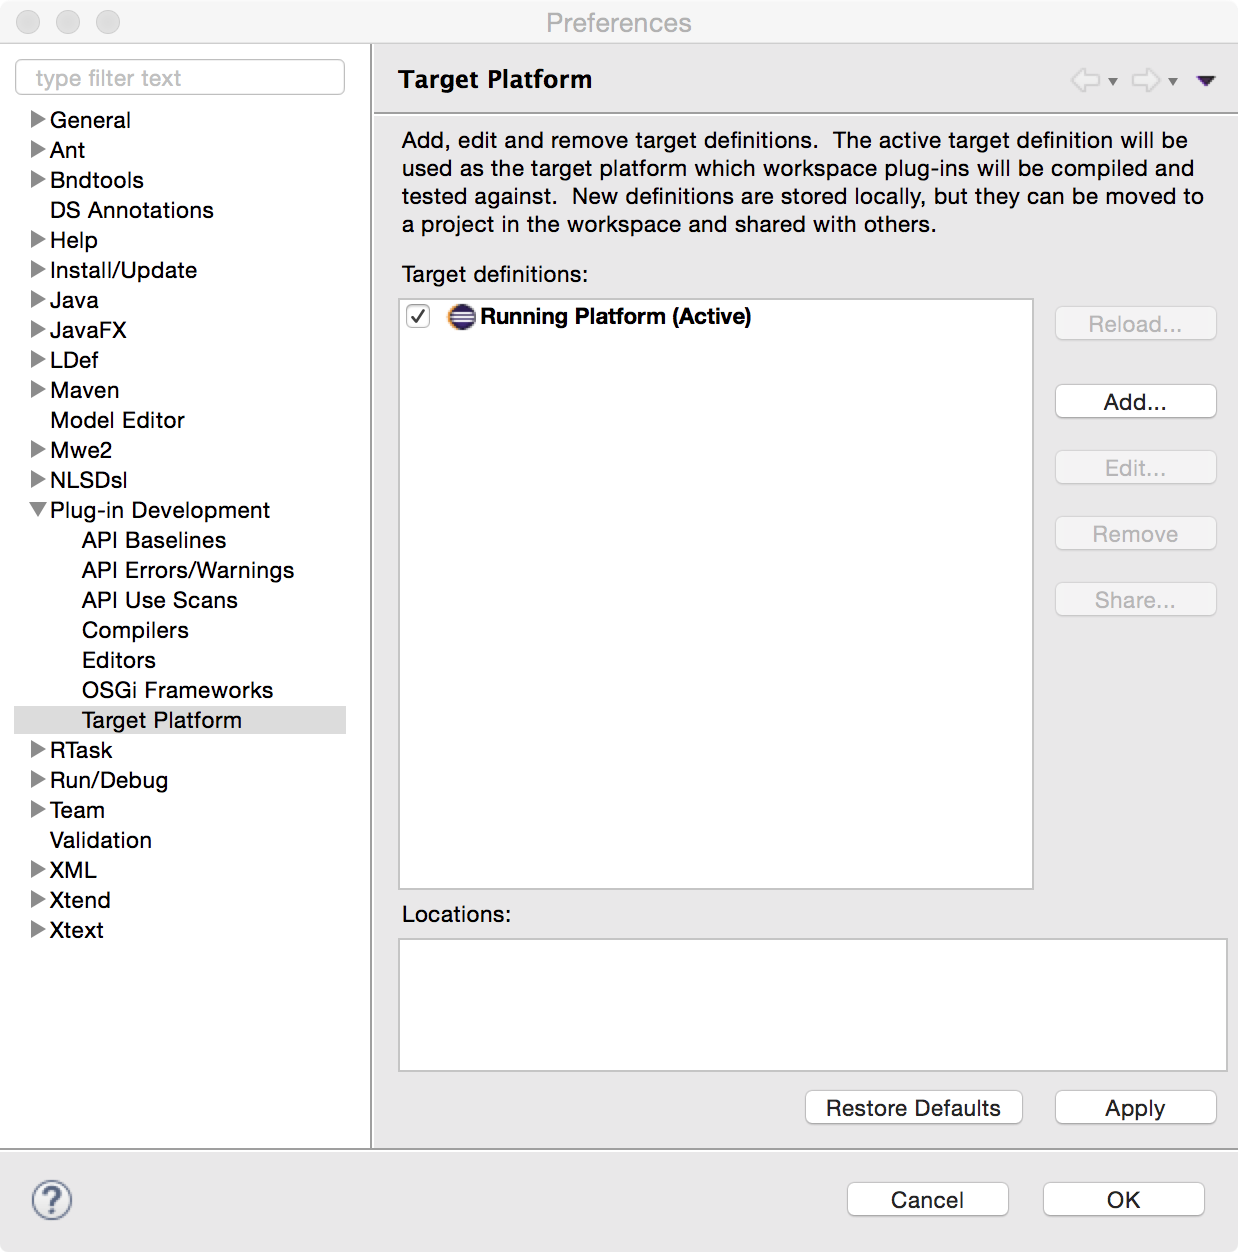
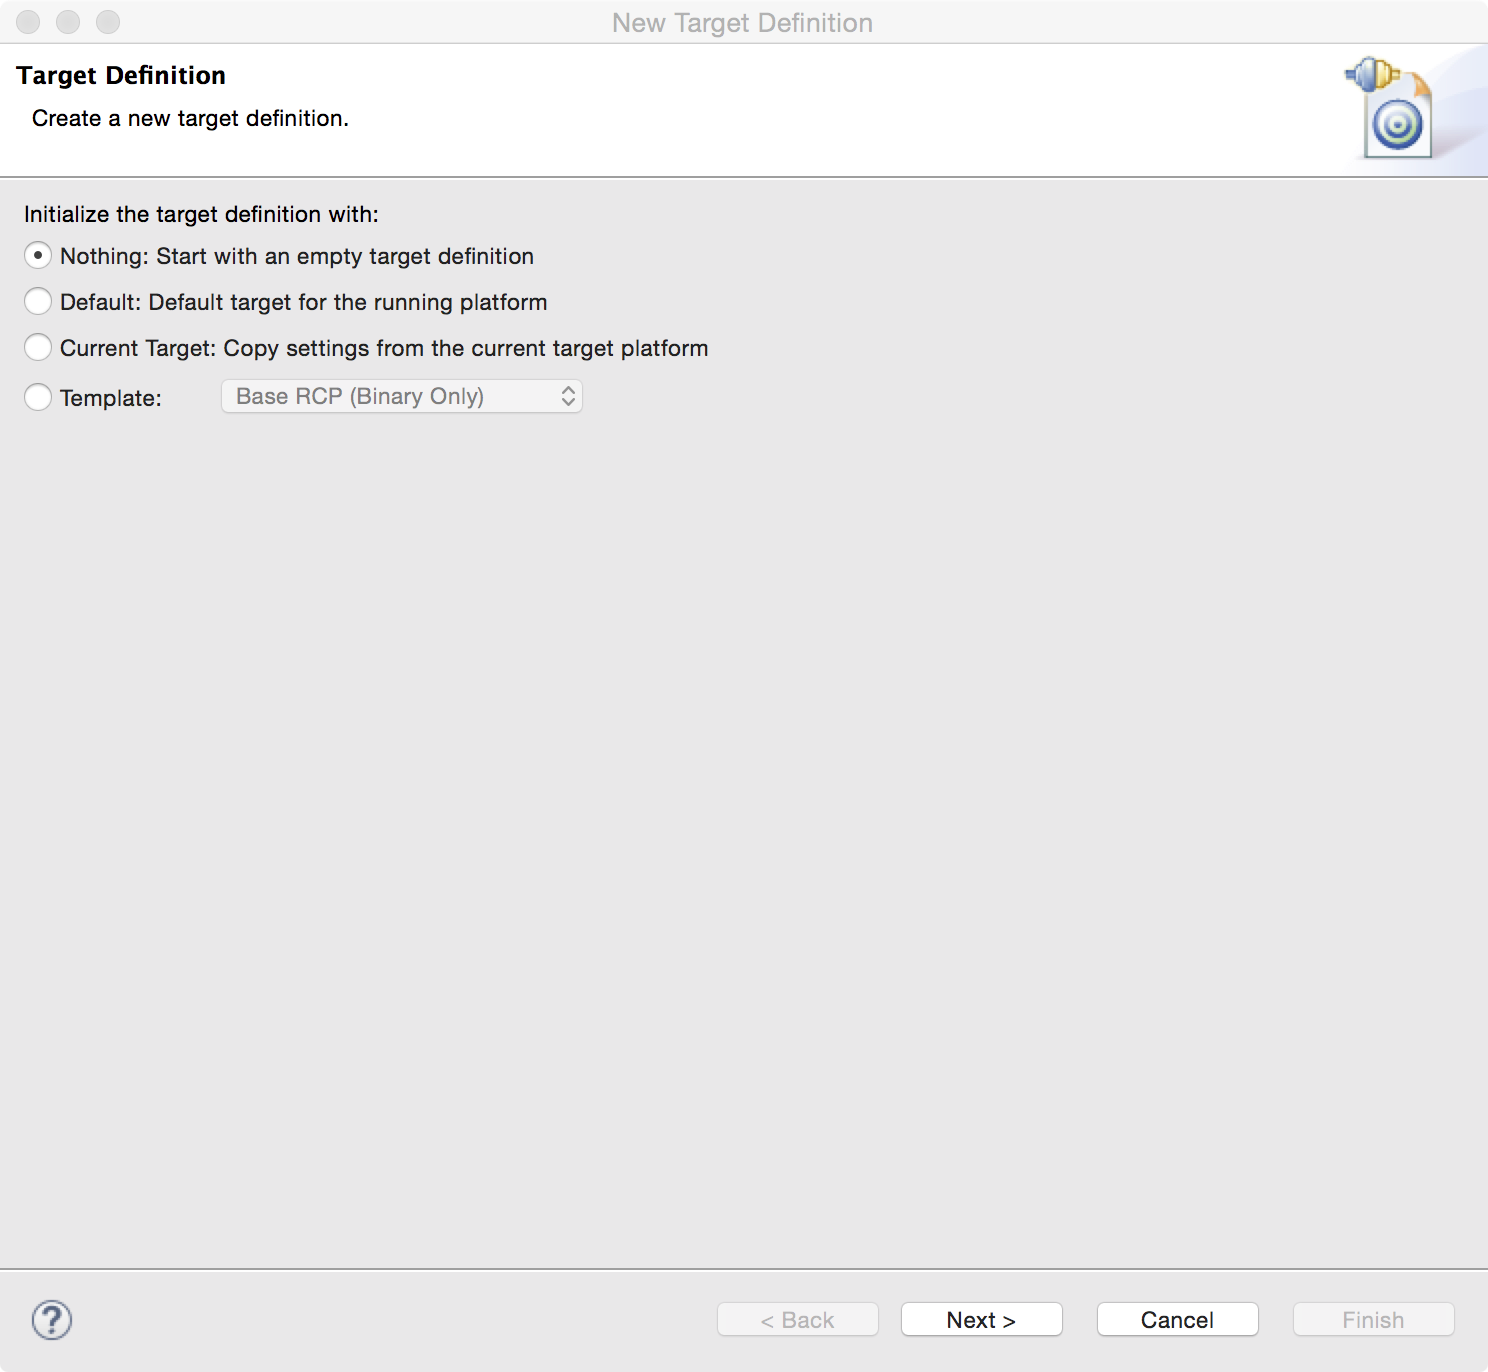
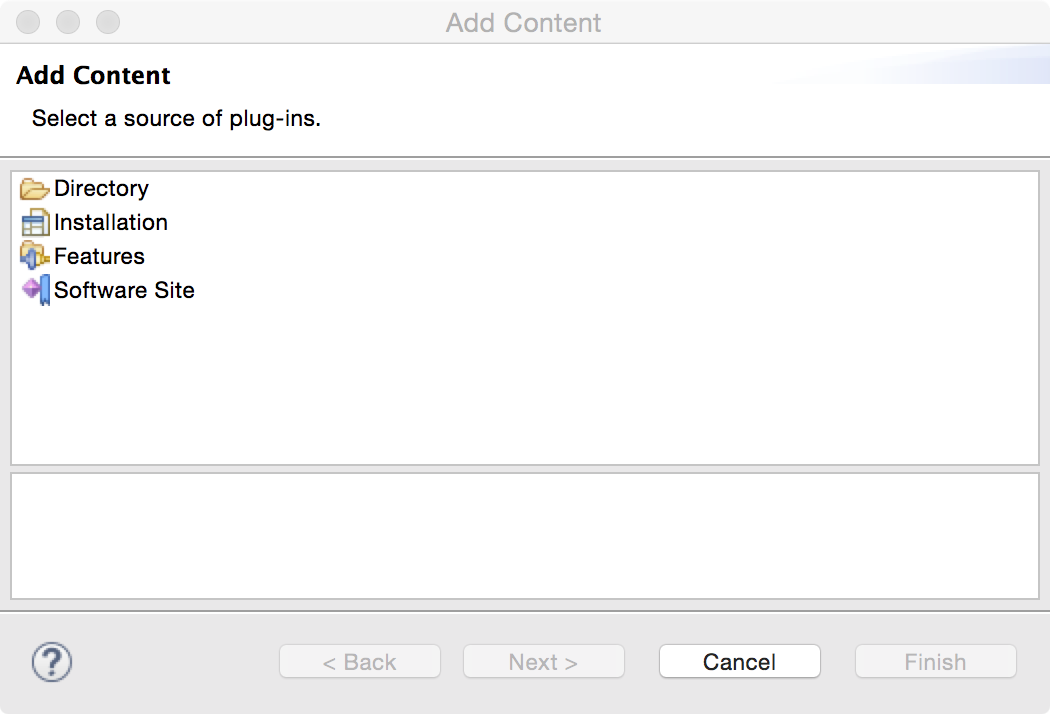
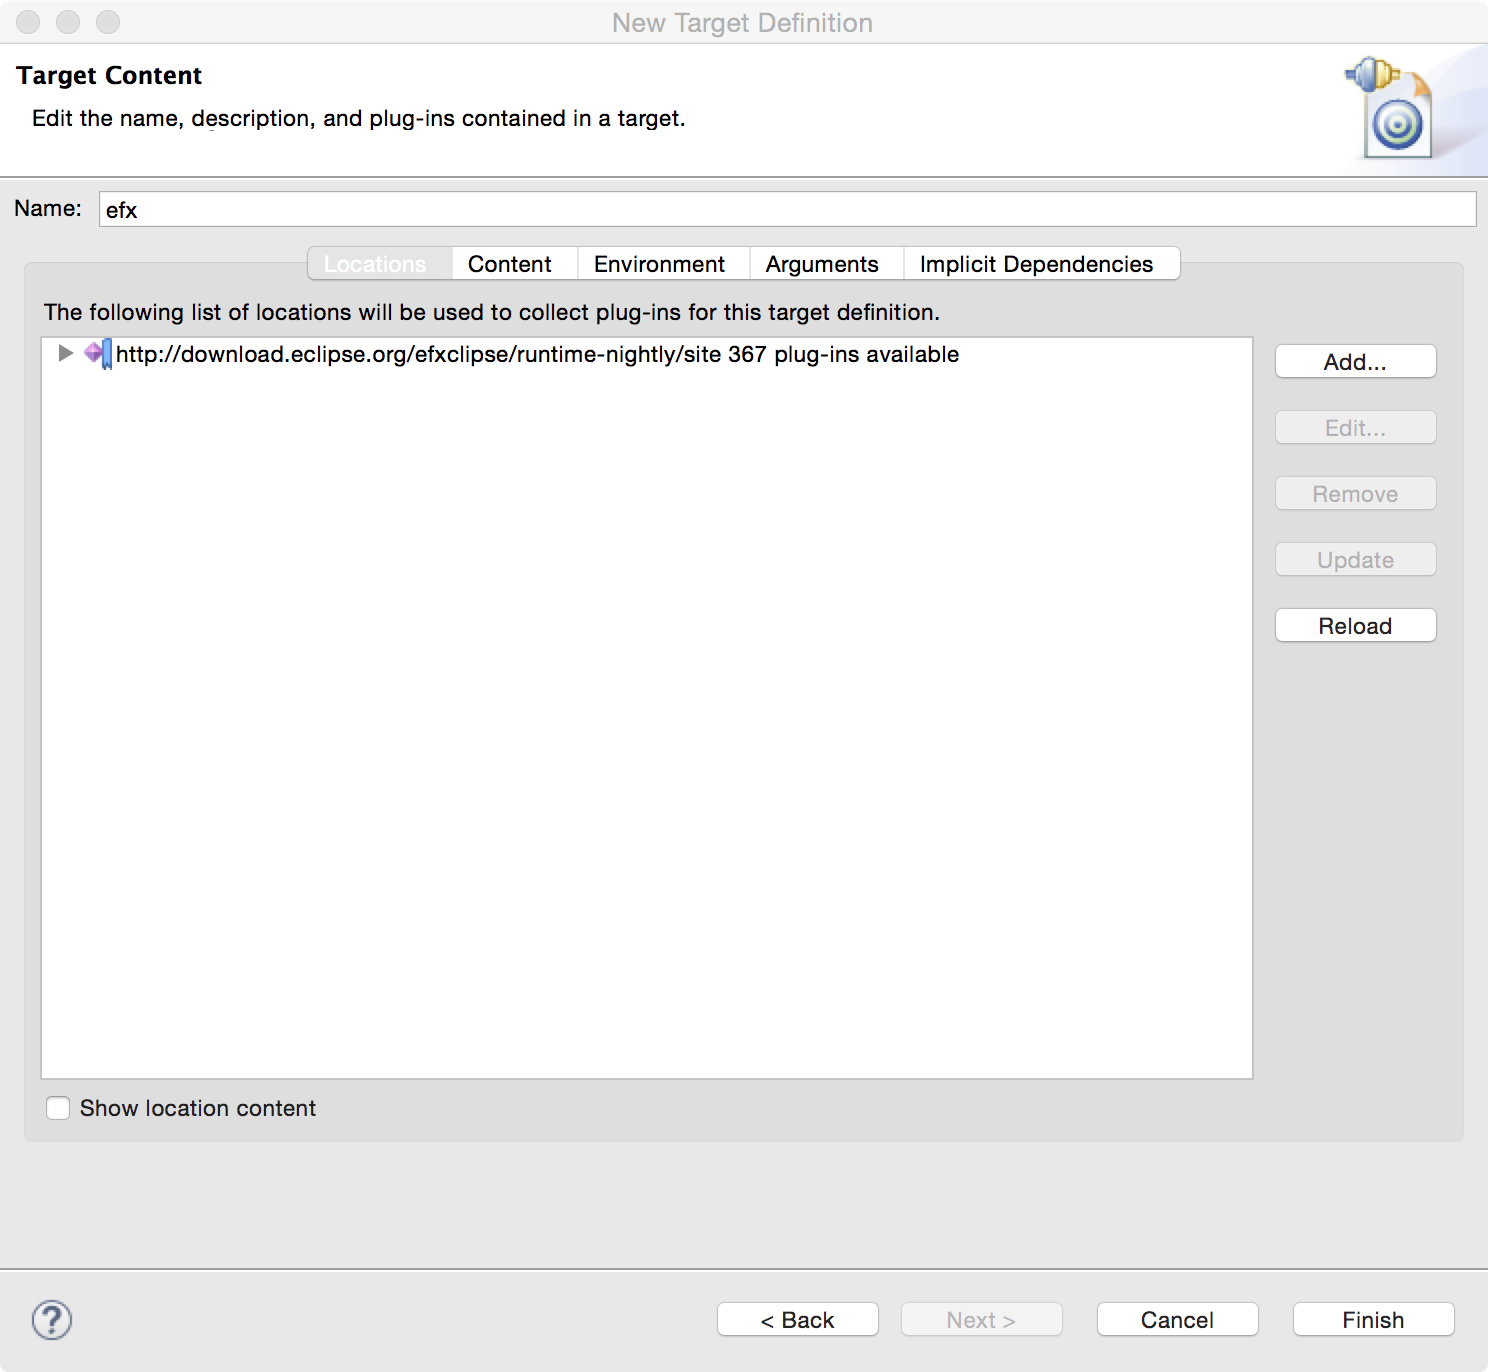
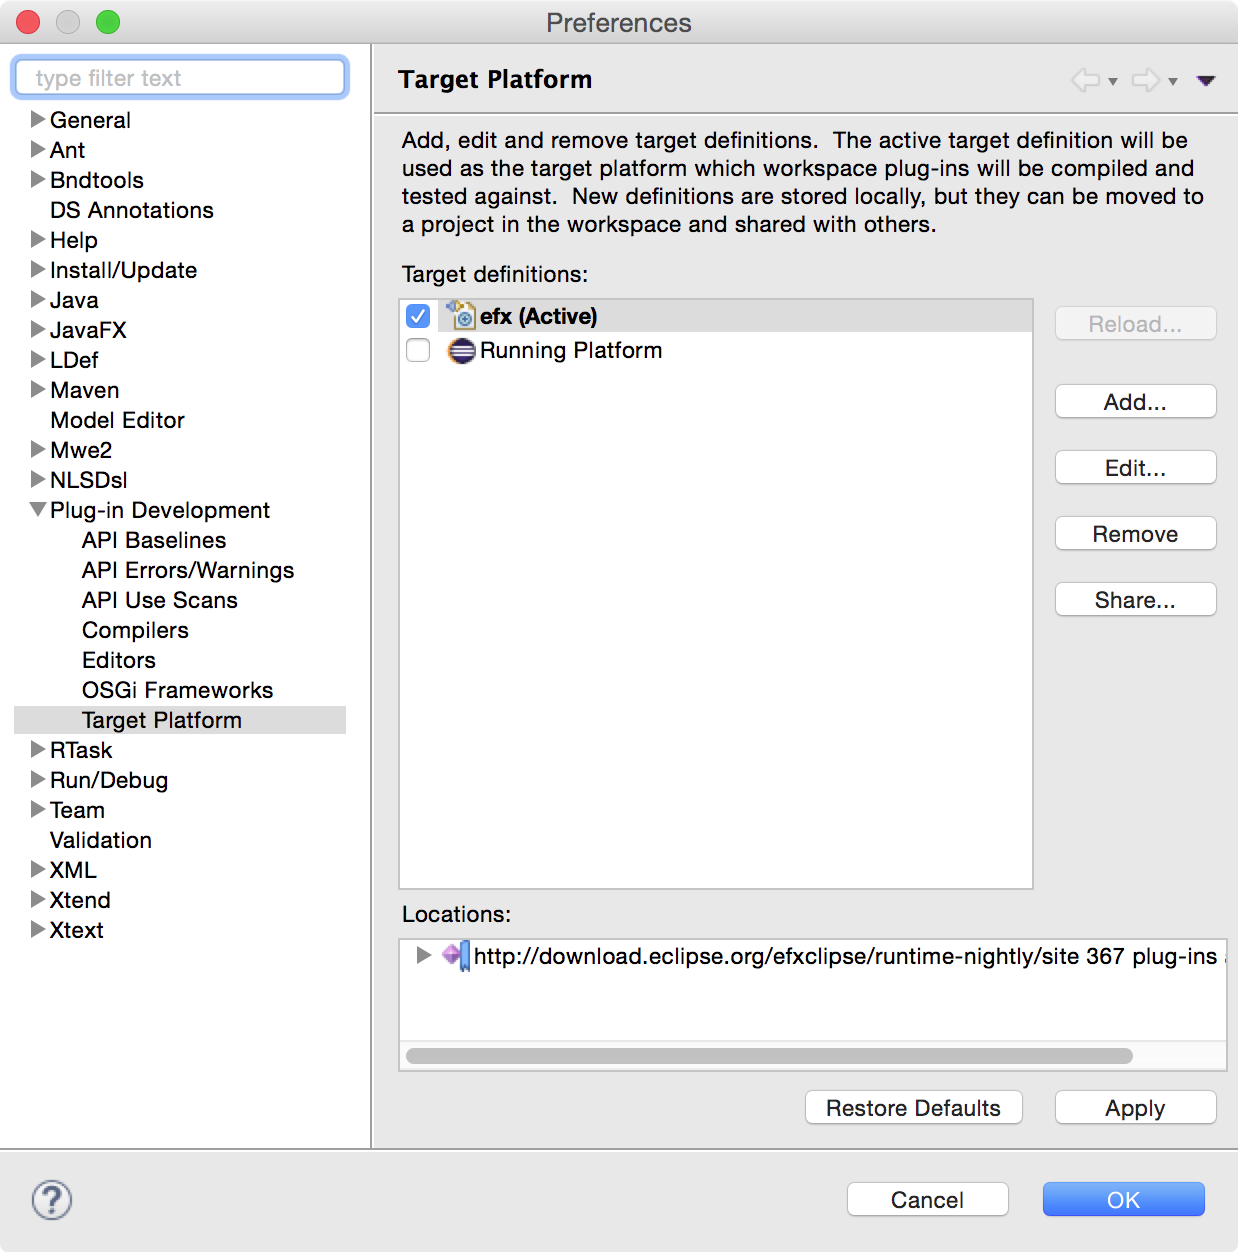
Set up a target platform
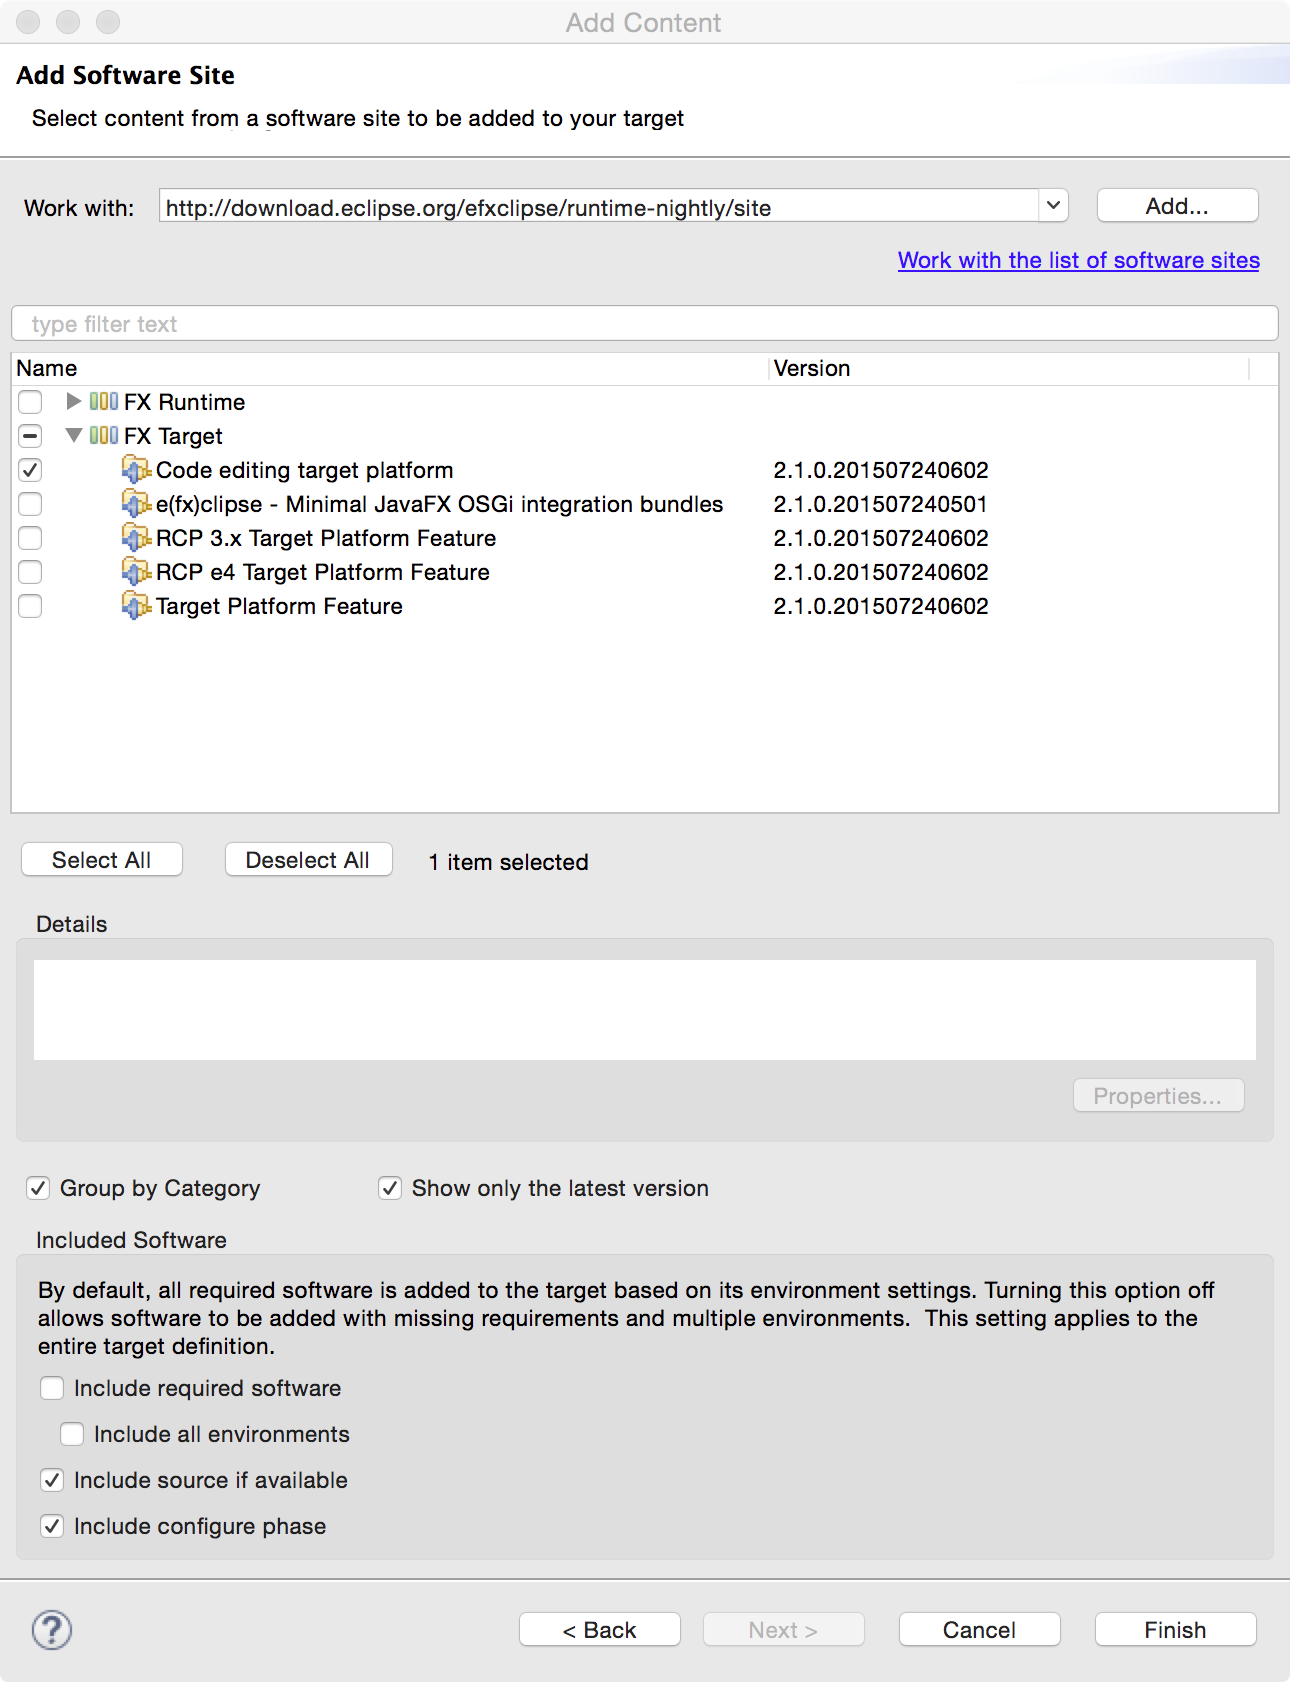
We have a self-contained target platform feature (org.eclipse.fx.code.target.feature) available from our runtime-p2 repository to get started super easy.
Warning: Make sure you uncheck “Include required software” because the target won’t resolve if you have that checked!
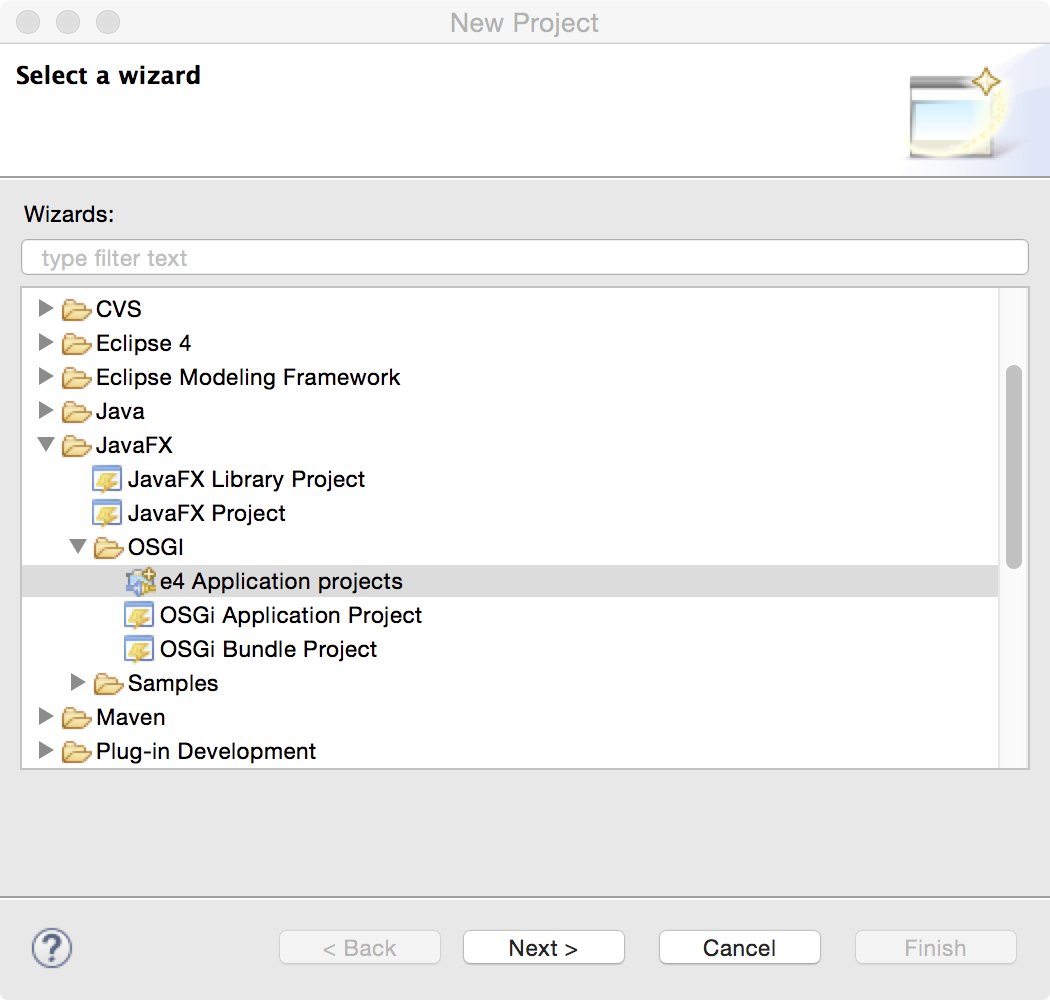
Setup the project
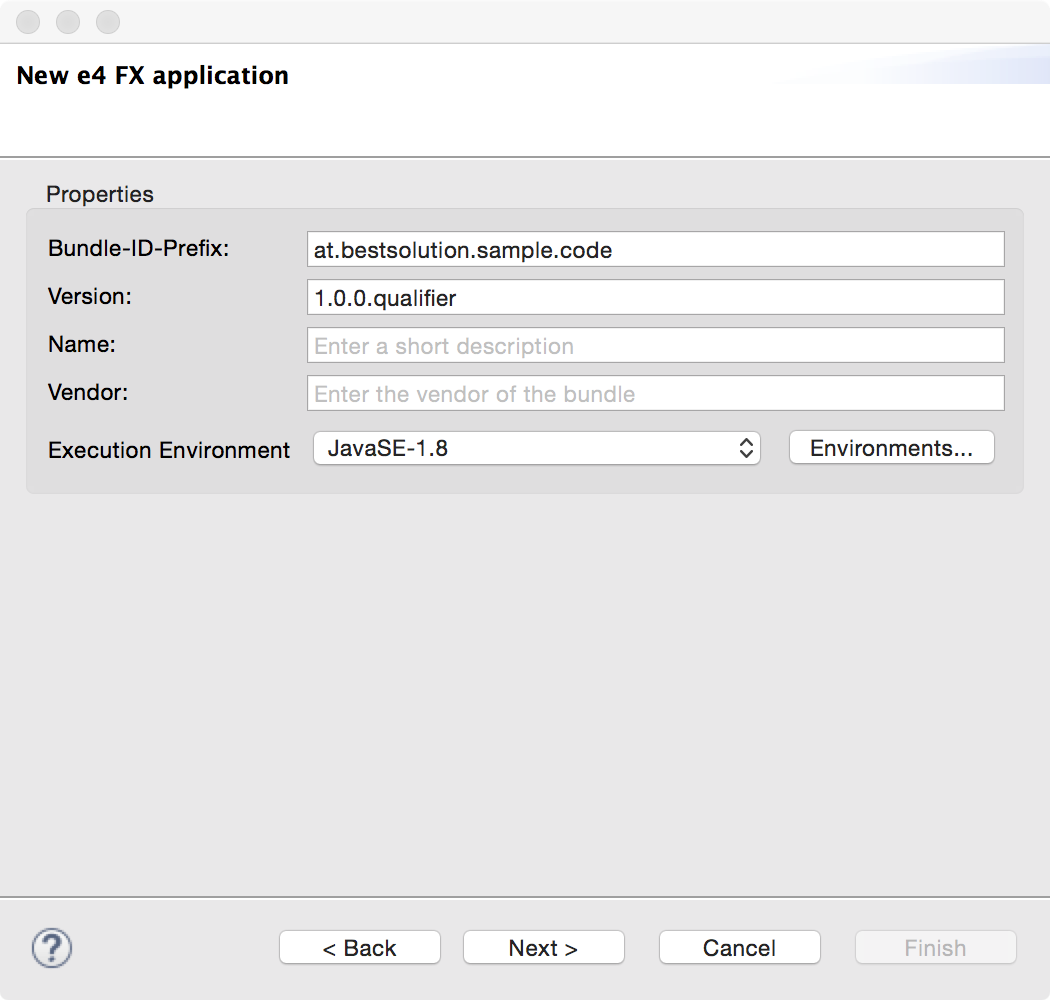
The project setup is done like you are used to for all e4 on JavaFX applications.
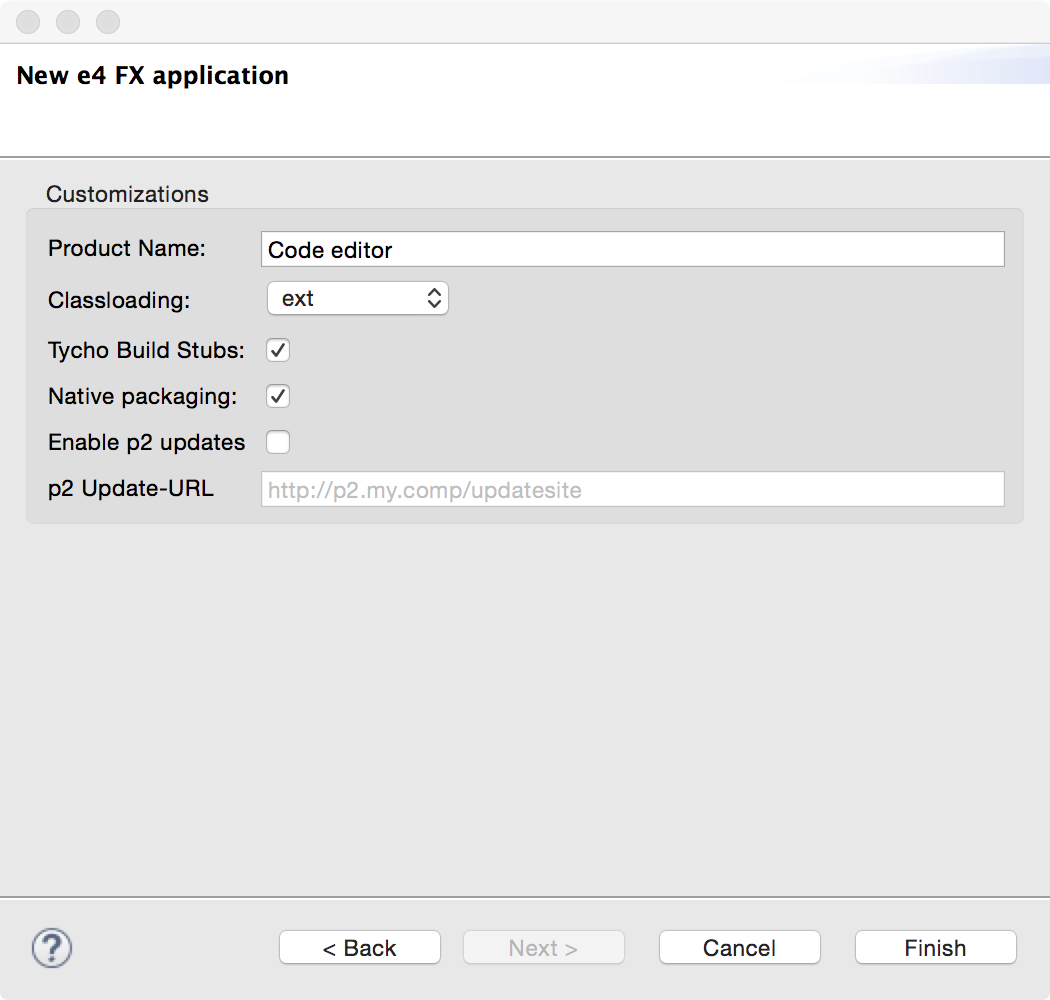
The wizard should have created:
at.bestsolution.sample.code.app: The main application module
at.bestsolution.sample.code.app.feature: The feature making up the main application module
at.bestsolution.sample.code.app.product: The product definition require for exporting
at.bestsolution.sample.code.app.releng: The release engineering project driving the build
Now we need to add some dependencies to your MANIFEST.MF:
org.eclipse.fx.core: Some Core APIs
org.eclipse.fx.code.editor: Core (=UI Toolkit independent) APIs for code editors
org.eclipse.fx.code.editor.fx: JavaFX dependent APIs for code editors
org.eclipse.text: Core APIs for text parsing, …
org.eclipse.fx.text: Core APIs for text parsing, highlighting, …
org.eclipse.fx.text.ui: JavaFX APIs for text parsing, highlighting, …
org.eclipse.fx.ui.controls: Additional controls for eg a File-System-Viewer
org.eclipse.osgi.services: OSGi-Service APIs we make use of when generateing DS-Services
org.eclipse.fx.core.di: Dependency Inject addons
org.eclipse.fx.code.editor.e4: code editor integration to e4
org.eclipse.fx.code.editor.fx.e4: JavaFX code editor integration to e4
For export reasons also add all those bundles to the feature.xml in at.bestsolution.sample.code.app.feature.
Generate editor infrastructure
Having everything configured now appropriately we start developing:
Xtext will prompt to add the Xtext nature to your project . Choose “YES”
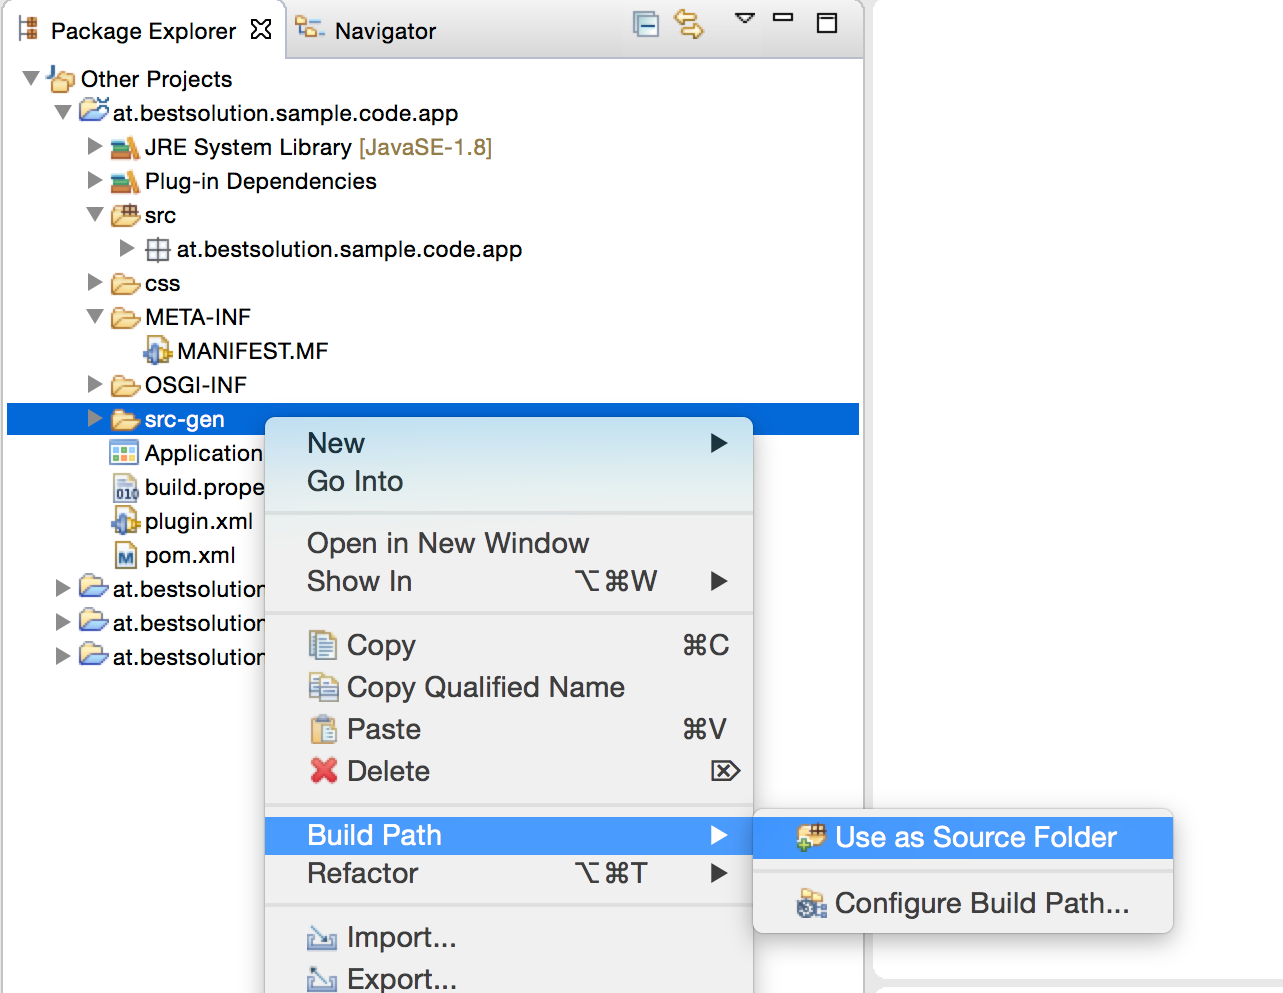
The sources are generated into the src-gen folder you should add that one to your build path
It’s important to note that beside the files generated by the ldef-Language there are 2 files generated to your OSGi-INF-Folder by DS-Tooling from ca.ecliptical.pde.ds
Generate Java code for the partitioning and tokenizing
Generate e4 registration informations in terms of OSGi-Services
In contrast to the last blog where we’ve run our stuff in an NONE-OSGi/NONE-e4-world where we had to wire stuff ourselves this is not needed this time because the Eclipse DI container will take care of that!
Define a Filesystem-Viewer-Part
To browse the filesystem we need a viewer which might look like this:
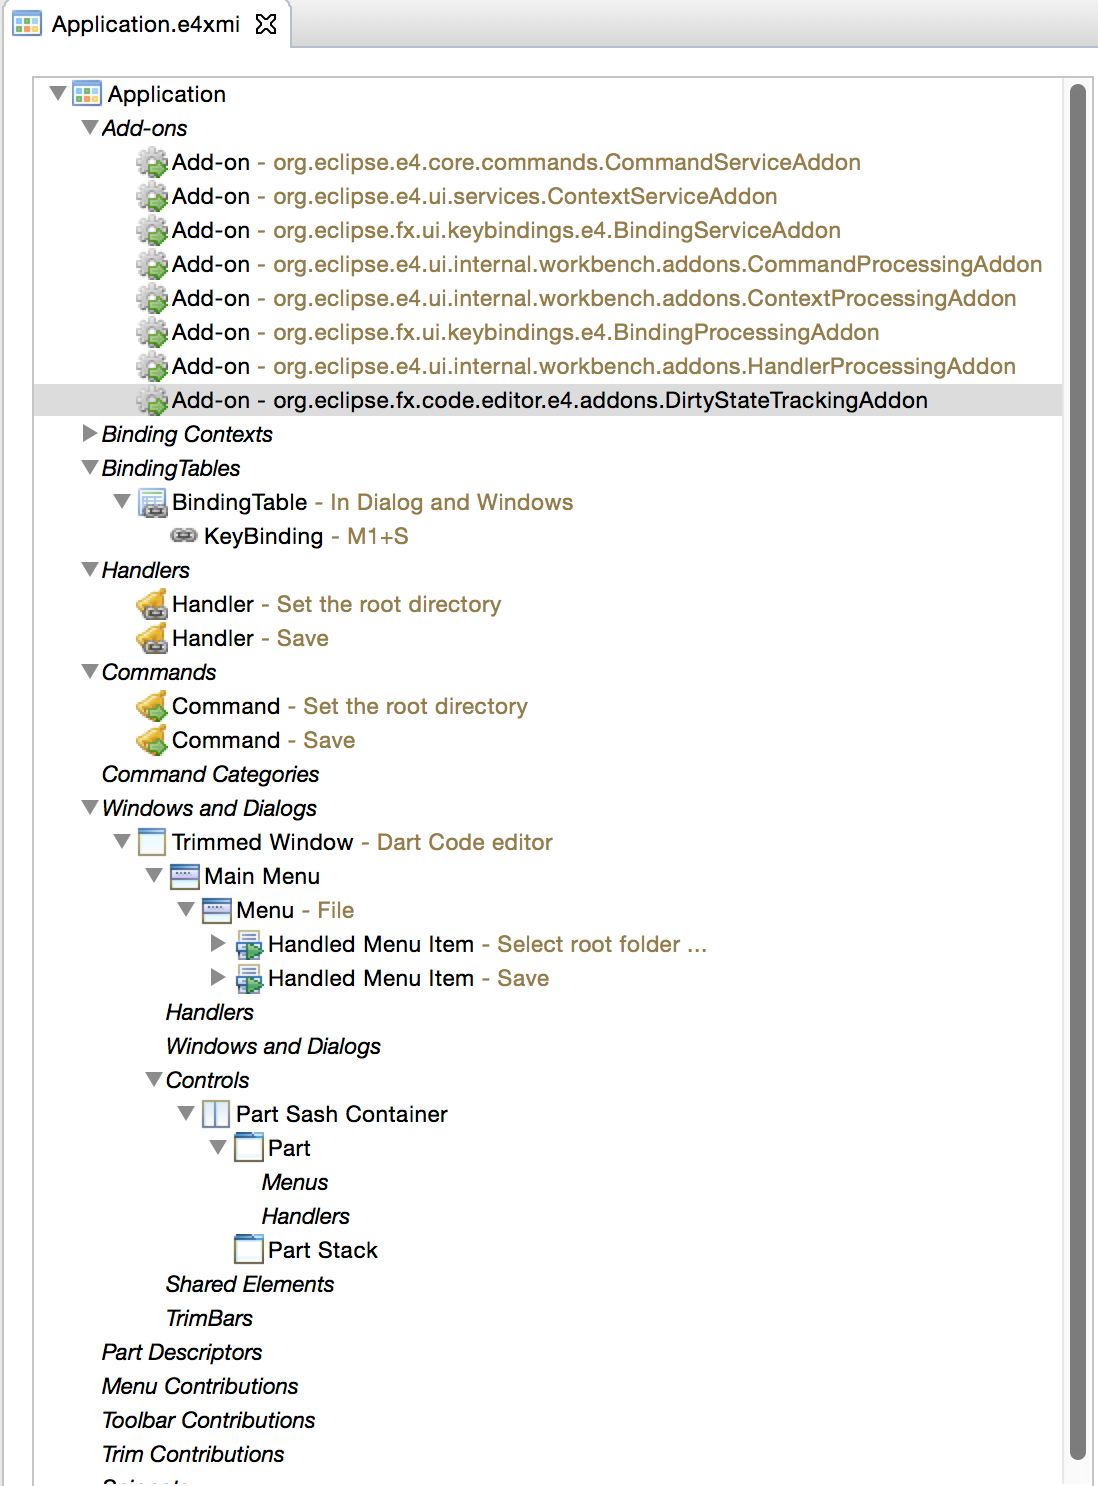
e4 applications as you already know are not defined by code but with the help of the e4 application model which is stored by default in e4xmi-Files. The final model has to looks like this:
The important parts are:
DirtyStateTrackingAddon: Is a special addon who tracks the dirty state of the editor and should be added to the applications Addon section
Handler: We using a framework handler org.eclipse.fx.code.editor.e4.handlers.SaveFile
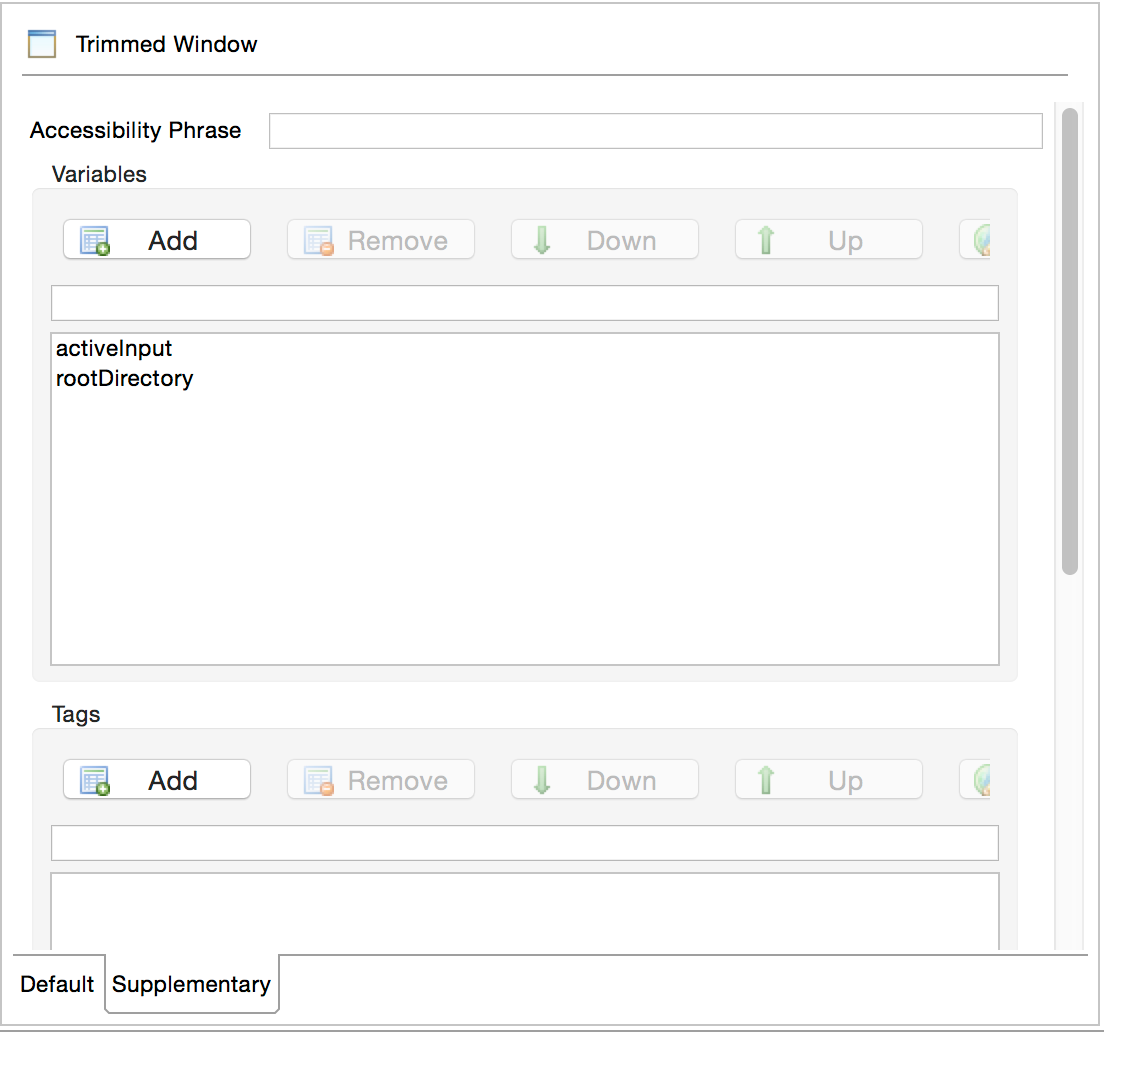
Window-Variables: We have 2 special variables defined at the window level (activeInput, rootDirectory)
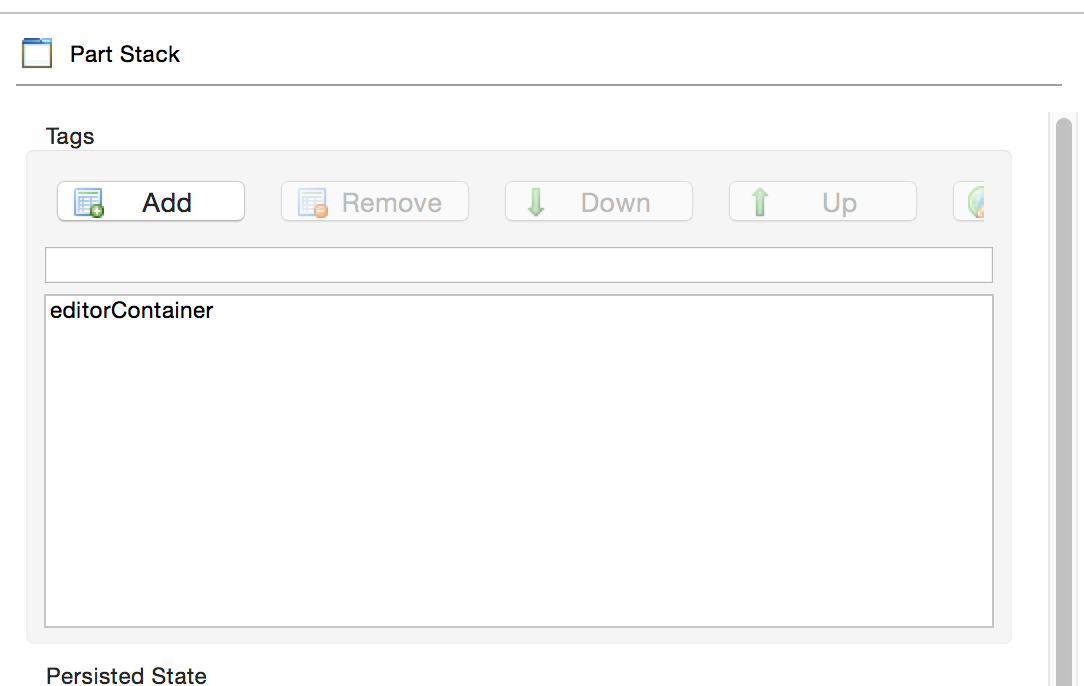
PartStack-Tags: We tagged the Part Stack who is hosting the editors with editorContainer
Resource Viewer Part: We register the resource viewer implementation from above to the part definition
Root Directory Handler: To set the root directory we have a handler who looks like this
Now you can launch the application with the already generated Launch-Config. Afterwards use the Menu-Entry (“Select root folder …”) to set a root directory who contains dart-Files and double click on one of the files.